Creating manufacturer-specific clusters in Matter application
This guide describes how you can create a manufacturer-specific cluster for the Matter: Template sample.
The Matter: Manufacturer-specific sample already contains a custom NordicDevkit cluster that you can use as a reference.
Overview
A manufacturer-specific cluster is a cluster that is not defined in the Matter Device Type Library Specification. The cluster description is written in XML format and is used to generate the C++ source files that provide the cluster implementation. You can add the cluster to the Matter data model definition file and use it in the ZAP tool to generate the source files.
Requirements
To take advantage of this guide, you need to be familiar with the Matter architecture and configuration, and have built and tested at least one of the available Matter samples.
Copy Matter template sample
Use the Matter: Template sample as the base for building a manufacturer-specific device as follows:
Make sure that you meet the requirements for building the sample.
Copy the contents of the
samples/matter/templatedirectory to a new directory meant for your custom application. For example,samples/matter/sensor.Build and test the sample as described on its documentation page.
Create a new cluster description file in XML format
You can create a new cluster description file in the following ways:
Using the Matter Cluster Editor app. The related tab provides the steps to create a new cluster description file.
Manually by writing an XML file. The related tab explains each element of the XML file to help you create the file manually. You can also use the example of the XML file provided at the end of this section.
Before using the tool, you need to download and install it. See the Matter Cluster Editor app documentation for installation instructions.
Once you have the tool installed, you can create a new cluster description file. Complete the following steps:
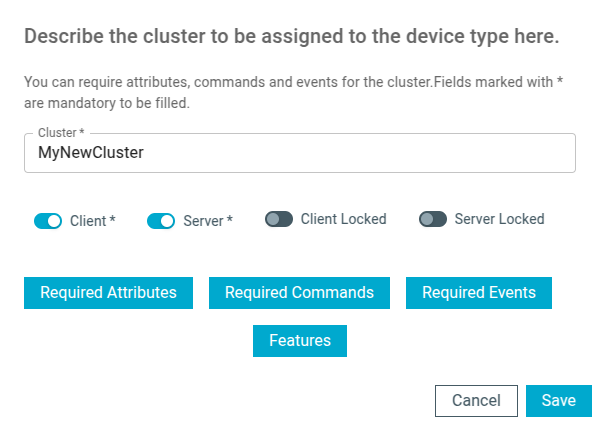
Edit the CLUSTER tab contents.
Open the CLUSTER tab.
Fill in the domain, name, code, define, and description of the cluster as follows:
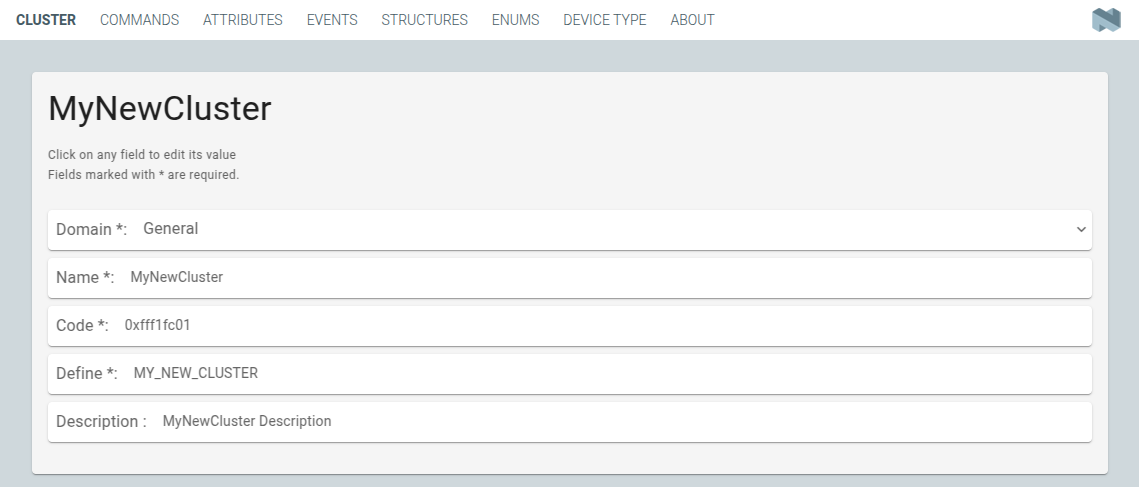
CLUSTER tab
Add a new command in the COMMANDS tab.
Open the COMMANDS tab.
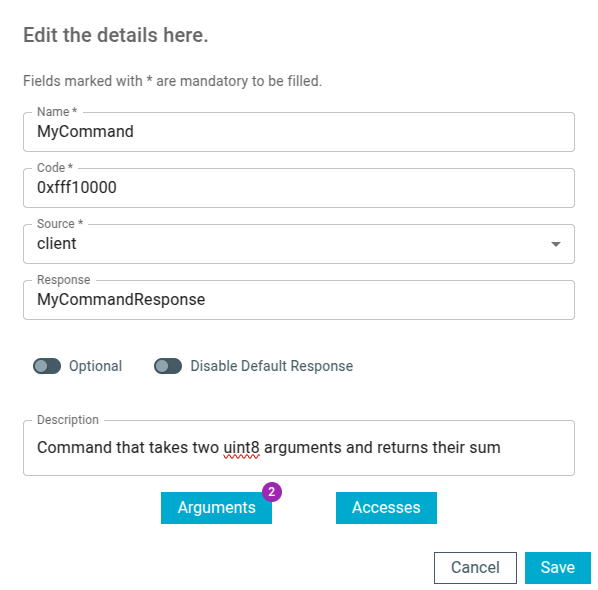
Click Add command to open edit box.
In the edit box, set the following values:
Name as
MyCommandCode as
0xFFF10000Source as
clientDescription as
Command that takes two uint8 arguments and returns their sum
Click Arguments.
In the new edit box, click the plus icon to create a new argument.
Fill in Name as
arg1, Type asint8u, Max as100.Click the plus icon again to create second argument.
Fill in Name as
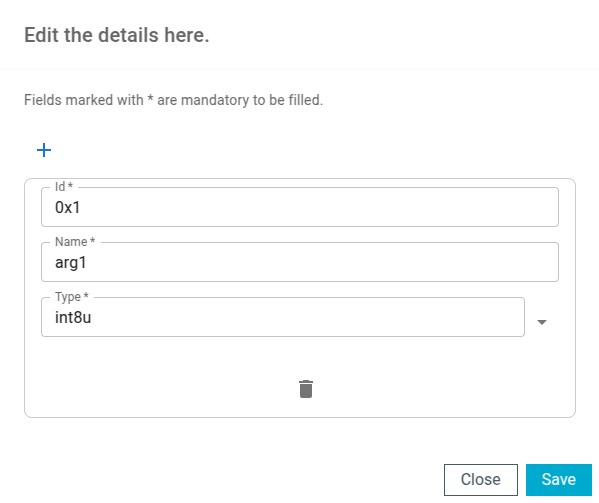
arg2, Type asint8u, Max as100.The following figure shows the filled in edit box dialog with two arguments added:
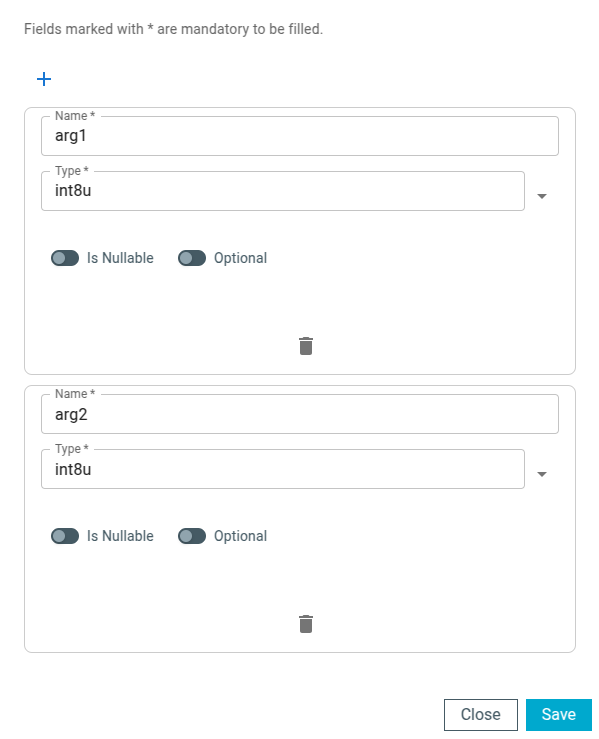
Arguments tab
Click Save to save the arguments.
The following figure shows the filled in edit box dialog with the new command added:
Commands tab
Click Save to save the command.
Add a new argument in the ATTRIBUTES tab.
Open the ATTRIBUTES tab.
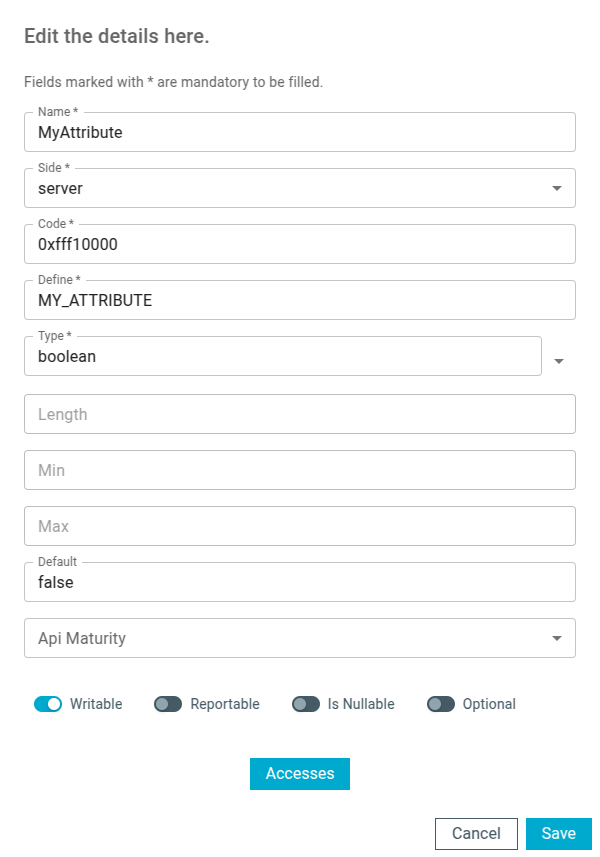
Click Add attribute to open edit box dialog.
Set the following values:
Name as
MyAttributeSide as
serverCode as
0xFFF10000Define as
MY_ATTRIBUTEType as
booleanWritable as
true
The following figure shows the filled in edit box dialog with the new attribute added:
Attributes tab
Click Save to save the attribute.
Add a new event in the EVENTS tab.
Open the EVENTS tab.
Click Add event to open edit box dialog.
In the edit box, set the following values:
Code as
0xFFF10000Name as
MyEventSide as
serverPriority as
infoDescription as
Event that is generated by the server
Click Fields.
In the new edit box, click the plus icon to add a new field.
Fill in the following values:
Field Id as
0x1Name as
arg1Type as
int8uMax as
10
The following figure shows the filled in edit box dialog with the new field added:
Fields tab
Click Save to save the field.
The following figure shows the filled in edit box dialog with the new event added:
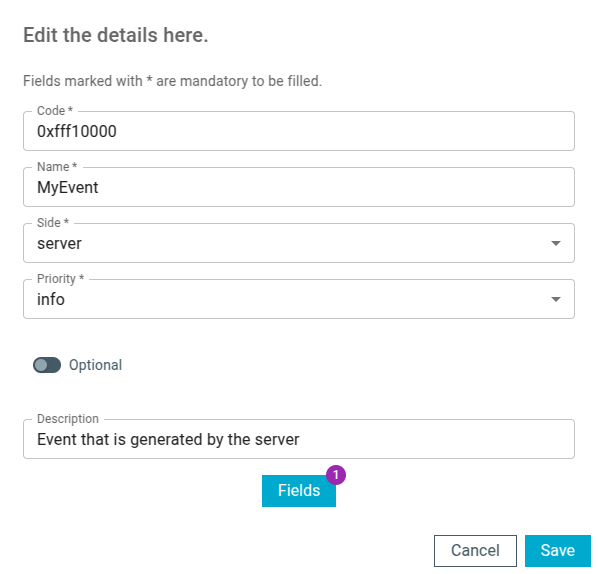
Events tab
Click Save to save the event.
Add a new structure in the STRUCTURES tab.
Open the STRUCTURES tab.
Click Add structure to open edit box dialog.
In the edit box, set the following values:
Name as
MyStructIs Fabric Scoped as
true
Click Items.
In the new edit box, click the plus icon to create a new item.
Fill in the following values:
Field Id as
0x1Name as
value1Type as
int8uIs Fabric Sensitive as
trueMin as
5Max as
15
The following figure shows the filled in edit box dialog with the new item added:
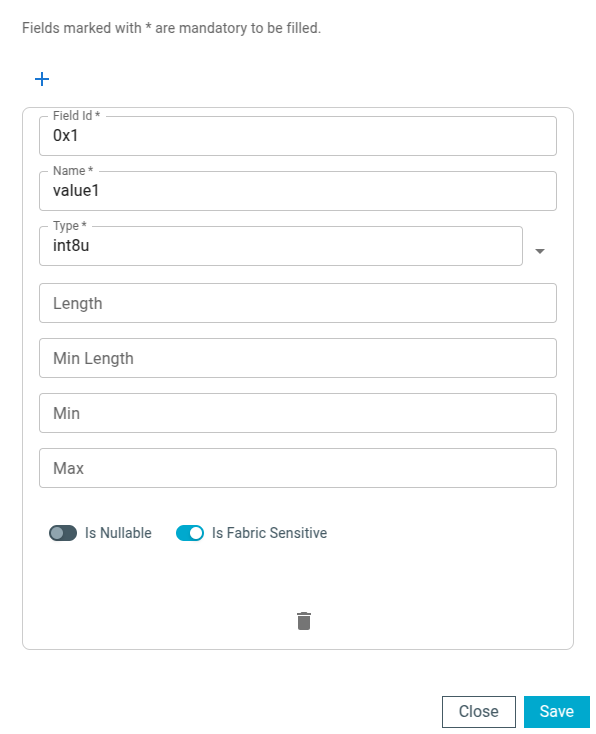
Structure items tab
Click Save to save the item.
Click Assigned clusters to open edit box dialog.
In the new edit box, click the plus icon to create a new cluster assignment.
Fill in
Codewith the value of the cluster code defined in first step as0xFFF1FC01.The following figure shows the filled in edit box dialog with the new cluster added:
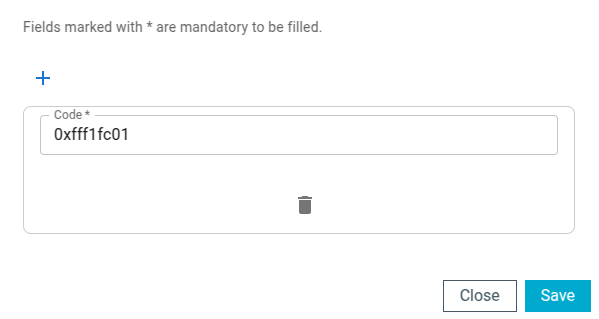
Assigned clusters tab
Click Save to save the cluster.
The following figure shows the filled in edit box dialog with the new structure added:
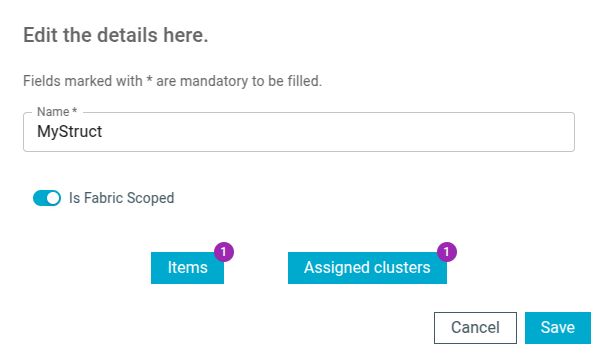
Structures tab
Click Save to save the structure.
Add a new enum in the ENUMS tab.
Open the ENUMS tab.
Click Add enum to open edit box dialog.
Set the following values:
Name as
MyEnumType as
int8u
Click Items.
In the new edit box, click the plus icon to create a new item.
Fill in the following values:
Name as
EnumValue1Value as
0
Click the plus icon to create a new item.
Fill in the following values:
Name as
EnumValue2Value as
1
The following figure shows the filled in edit box dialog with the new items added:

Items tab
Click Save to save the item.
Click Assigned clusters to open edit box dialog.
In the new edit box, click the plus icon to create a new cluster assignment.
Fill in
Codewith the value of the cluster code defined in first step as0xFFF1FC01.The following figure shows the filled in edit box dialog with the new cluster assignment added:
Assigned clusters tab
Click Save to save the cluster.
The following figure shows the filled in edit box dialog with the new enum added:
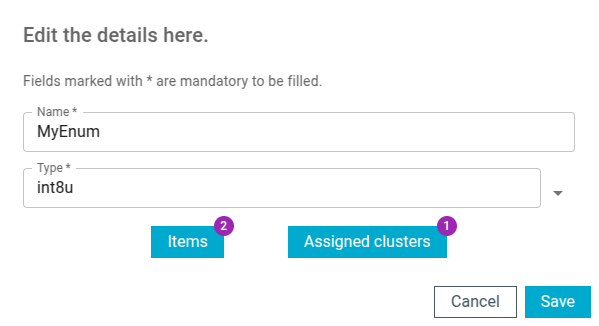
Enums tab
Click Save to save the enum.
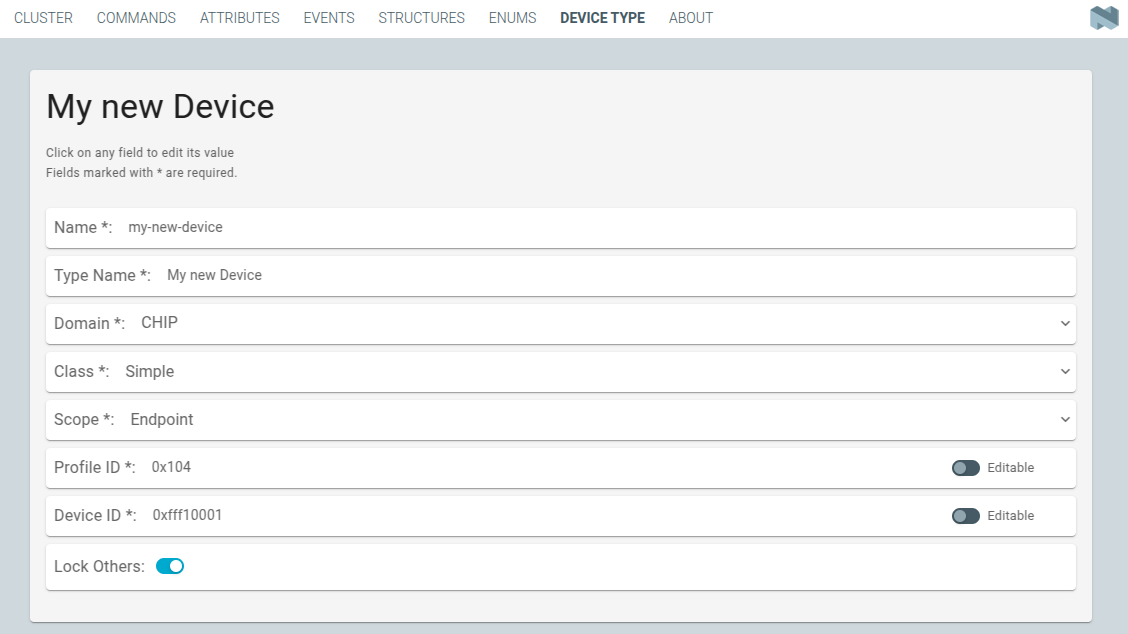
Add a new device type in the DEVICE TYPE tab.
Click the Save cluster to file button to save the cluster description file to the sample directory and name it as
MyCluster.xml.
The file should contain cluster definitions, attributes, commands, events, enums, structs, and device types in XML format.
The cluster <code> is a 32-bit combination of the vendor ID and cluster ID and must be unique, not conflicting with existing clusters.
The most significant 16 bits are the vendor ID, and the least significant 16 bits are the cluster ID.
The vendor ID must be configured according to the Matter specification (section 2.5.2 Vendor Identifier).
The cluster ID for a manufacturer-specific cluster must be in the range from 0xFC00 to 0xFFFE.
The example contains a cluster with the code 0xFFF1FC01, which means 0xFFF1 is the Test Manufacturer ID, and 0xFC01 is the cluster ID.
See the <default Matter SDK location>/src/app/zap-templates/zcl/data-model/manufacturers.xml file to learn about the manufacturer codes.
The XML file consists of the following elements:
<cluster>- Cluster definition.<clusterExtension>- Cluster extension definition.<enum>- Enumerated type definition.<struct>- Structure definition.<deviceType>- Device type definition.
See the description of each element in the following tabs:
<cluster> defines the cluster and consist of the following child elements:
<domain>- The domain to which the cluster belongs.<name>- The name of the cluster.<code>- A 32-bit identifier for the cluster, combining the vendor ID and a cluster ID.<define>- The C++ preprocessor macro name for the cluster, typically in uppercase with words separated by underscores.<description>- A brief description of the cluster’s purpose and functionality.<attribute>- An attribute definition within the cluster.side- Specifies whether the attribute is on the client or server side.code- A unique identifier for the attribute within the cluster.define- The C++ preprocessor macro name for the attribute, typically in uppercase with words separated by underscores.type- The data type of the attribute.entryType- The data type of array elements if the attribute is an array.writable- Indicates whether the attribute can be written by a Matter controller.default- The default value of the attribute.optional- Indicates whether the attribute is optional.name- The name of the attribute.
<command>- A command definition within the cluster.source- Specifies whether the command originates from the client or server.code- A unique identifier for the command within the cluster.name- The name of the command.optional- Indicates whether the command is optional.disableDefaultResponse- Indicates whether the default response to the command is disabled.response- The name of the response command, if any.description- A brief description of the command’s purpose and functionality.arg- An argument for the command, specifying its name and type.
<event>- An event definition within the cluster.side- Specifies whether the event originates from the client or server.code- A unique identifier for the event within the cluster.name- The name of the event.optional- Indicates whether the event is optional.description- A brief description of the event’s purpose and functionality.arg- An argument for the event, specifying its name and type.
For example, the following XML code defines a cluster with one attribute, one command, and one event:
<?xml version="1.0"?>
<cluster>
   <domain>General</domain>
   <name>MyNewCluster</name>
   <code>0xFFF1FC01</code>
   <define>MY_NEW_CLUSTER</define>
   <description>The MyNewCluster cluster showcases cluster manufacturer extensions</description>
   <attribute side="server" code="0xFFF10000" define="MY_ATTRIBUTE" type="boolean" writable="true" default="false" optional="false">MyAttribute</attribute>
   <command source="client" code="0xFFF10000" name="MyCommand" response="MyCommandResponse" optional="false">
      <description>Command that takes two uint8 arguments and returns their sum.</description>
      <arg name="arg1" type="int8u"/>
      <arg name="arg2" type="int8u"/>
   </command>
   <event side="server" code="0xFFF10000" name="MyEvent" priority="info" optional="false">
      <description>Event that is generated by the server.</description>
      <arg name="arg1" type="int8u"/>
   </event>
</cluster>
<clusterExtension> defines the extension of an existing cluster and consist of the following attributes and child elements:
code- A 32-bit identifier for the existing cluster, that will be extended.<attribute>- An attribute definition within the cluster.side- Specifies whether the attribute is on the client or server side.code- A unique identifier for the attribute within the cluster.define- The C++ preprocessor macro name for the attribute, typically in uppercase with words separated by underscores.type- The data type of the attribute.entryType- The data type of array elements if the attribute is an array.writable- Indicates whether the attribute can be written by a Matter controller.default- The default value of the attribute.optional- Indicates whether the attribute is optional.name- The name of the attribute.
<command>- A command definition within the cluster.source- Specifies whether the command originates from the client or server.code- A unique identifier for the command within the cluster.name- The name of the command.optional- Indicates whether the command is optional.disableDefaultResponse- Indicates whether the default response to the command is disabled.response- The name of the response command, if any.description- A brief description of the command’s purpose and functionality.arg- An argument for the command, specifying its name and type.
<event>- An event definition within the cluster.side- Specifies whether the event originates from the client or server.code- A unique identifier for the event within the cluster.name- The name of the event.priority- The priority of the event. The valid values aredebug,info, andcritical.optional- Indicates whether the event is optional.description- A brief description of the event’s purpose and functionality.arg- An argument for the event, specifying its name and type.
For example, the following XML code extends a Basic Information cluster with one attribute, one command, and one event:
<?xml version="1.0"?>
<clusterExtension code="0x0028">
   <attribute side="server" code="0x17" define="EXTENDED_ATTRIBUTE" type="boolean" writable="true" default="false" optional="false">ExtendedAttribute</attribute>
   <command source="client" code="0x00" name="ExtendedCommand" response="ExtendedCommandResponse" optional="false">
      <description>Command that takes two uint8 arguments and returns their sum.</description>
      <arg name="arg1" type="int8u"/>
      <arg name="arg2" type="int8u"/>
   </command>
   <command source="server" code="0x01" name="ExtendedCommandResponse" optional="false" disableDefaultResponse="true">
      <description>Response to ExtendedCommand.</description>
      <arg name="arg1" type="int8u"/>
   </command>
   <event side="server" code="0x04" name="ExtendedEvent" priority="info" optional="false">
      <description>Event that is generated by the server.</description>
      <arg name="arg1" type="int8u"/>
   </event>
</clusterExtension>
<enum> elements define the enumerated types that can be used in the cluster and consist of the following attributes and child elements:
name- The unique name of the enumerated type.<cluster code>- The cluster codes that the enumerated type is associated with. An enumerated type can be associated with multiple clusters by defining multiple<cluster code>elements. If no cluster code is specified, the enumerated type has a global scope.type- The data type of the enumerated values.<item>- The definition of an individual item within the enumerated type.name- The name of the item.value- The value assigned to the item, which must match the specified data type of the enumerated type.
For example, the following XML code defines an enumerated type with two items:
<enum name="MyNewEnum" type="uint8">
   <cluster code="0xFFF1FC01" />
   <item name="EnumValue1" value="0" />
   <item name="EnumValue2" value="1" />
</enum>
<struct> elements define the structure types that can be used in the cluster and consist of the following attributes and child elements:
name- The unique name of the structure.isFabricScoped- Indicates if the structure is fabric-scoped.<cluster code>- The cluster codes that the structure is associated with. A structure can be associated with multiple clusters by defining multiple<cluster code>elements. If no cluster code is specified, the structure has a global scope.<item>- The definition of an individual item within the structure.fieldId- The unique ID of the item within the structure.name- The name of the item.type- The data type of the item.array- Indicates if the item is an array.minLength- The minimum length of the array, if applicable.maxLength- The maximum length of the array, if applicable.isNullable- Indicates if the item can be NULL.isFabricSensitive- Indicates if the item is fabric-sensitive.min- The minimum value of the item, if applicable.max- The maximum value of the item, if applicable.
For example, the following XML code defines a structure with one item of type octet string and length 128:
<struct name="MyStruct" isFabricScoped="true">
  <cluster code="0xFFF1FC01"/>
  <item fieldId="1" name="Data" type="octet_string" length="128" isFabricSensitive="true"/>
</struct>
<deviceType> elements define the device types that can be used in the cluster and consist of the following child elements:
<name>- The unique name of the device.<domain>- The domain to which the device belongs.<typeName>- The name of the device displayed in the zap tool.<profileId>- The profile ID reflects the current version of the Matter specification where the major version is the most significant byte (0x01), the minor version is the second most significant byte (0x04), and the dot version is the third most significant byte (0x02).editable- Indicates if the field can be modified.
<deviceId>- The device ID.editable- Indicates if the field can be modified.
<class>- The class of the device. Can beUtility,Simple, orNode.<scope>- The scope of the device. Can beNode, orEndpoint.<clusters>- The definition of an individual item within the structure.lockOthers- Indicates if other clusters are locked.<include>- Defines a cluster that should be included in the device.cluster- The name of the cluster.client- Indicates if the client role should be enabled.server- Indicates if the server role should be enabled.clientLocked- Indicates if the client role modification should be locked.serverLocked- Indicates if the server role modification should be locked.<requireAttribute>- Indicates a required attribute’s define.<requireCommand>- Indicates a required command’s define.
For example, the following XML code defines a structure with one item of type octet string and length 128:
<deviceType>
   <name>my-new-device</name>
   <domain>CHIP</domain>
   <typeName>My new device</typeName>
   <profileId editable="false">0x0104</profileId>
   <deviceId editable="false">0xfff10001</deviceId>
   <class>Simple</class>
   <scope>Endpoint</scope>
   <clusters lockOthers="true">
   <include cluster="MyNewCluster" client="true" server="true" clientLocked="false" serverLocked="false"/>
      <requireAttribute>MY_ATTRIBUTE</requireAttribute>
      <requireCommand>MyCommand</requireCommand>
   </clusters>
</deviceType>
Note
The descriptions of the elements show only the basic functionality. To see the full list of available elements for each part of the XML file, refer to the Matter Specification.
For an example, you can use the following template for the MyCluster.xml file:
<?xml version="1.0" encoding="UTF-8" standalone="yes"?>
<configurator>
<cluster>
   <domain>General</domain>
   <name>MyNewCluster</name>
   <code>0xfff1fc01</code>
   <define>MY_NEW_CLUSTER</define>
   <description>The MyNewCluster cluster showcases cluster manufacturer extensions</description>
   <attribute side="server" code="0xfff10000" define="MY_ATTRIBUTE" type="boolean" writable="true" default="false" optional="false" name="MyAttribute">
   </attribute>
   <command source="client" code="0xfff10000" name="MyCommand" optional="false">
      <description>Command that takes two uint8 arguments and returns their sum.</description>
      <arg name="arg1" type="int8u"/>
      <arg name="arg2" type="int8u"/>
   </command>
   <event side="server" code="0xfff10000" name="MyEvent" priority="info" optional="false">
      <description>Event that is generated by the server.</description>
      <arg name="arg1" type="int8u"/>
   </event>
</cluster>
<enum name="MyNewEnum" type="int8u">
   <cluster code="0xfff1fc01"/>
   <item name="EnumValue1" value="0"/>
   <item name="EnumValue2" value="1"/>
</enum>
<struct name="MyStruct" isFabricScoped="true">
   <cluster code="0xfff1fc01"/>
   <item fieldId="1" name="Data" type="octet_string" length="128" isFabricSensitive="true"/>
</struct>
<deviceType>
   <name>my-new-device</name>
   <domain>CHIP</domain>
   <typeName>My new device</typeName>
   <profileId editable="false">0x104</profileId>
   <deviceId editable="false">0xfff10001</deviceId>
   <class>Simple</class>
   <scope>Endpoint</scope>
   <clusters lockOthers="true">
      <include cluster="MyNewCluster" client="true" server="true" clientLocked="false" serverLocked="false"/>
   </clusters>
</deviceType>
<clusterExtension code="0x28">
   <attribute side="server" code="0x17" define="EXTENDED_ATTRIBUTE" type="boolean" writable="true" default="false" optional="false">ExtendedAttribute</attribute>
   <command source="client" code="0x0" name="ExtendedCommand" response="ExtendedCommandResponse" optional="false">
      <description>Command that takes two uint8 arguments and returns their sum.</description>
      <arg name="arg1" type="int8u"/>
      <arg name="arg2" type="int8u"/>
   </command>
   <command source="server" code="0x1" name="ExtendedCommandResponse" optional="false" disableDefaultResponse="true">
      <description>Response to ExtendedCommand.</description>
      <arg name="arg1" type="int8u"/>
   </command>
   <event side="server" code="0x4" name="ExtendedEvent" priority="info" optional="false">
      <description>Event that is generated by the server.</description>
      <arg name="arg1" type="int8u"/>
   </event>
</clusterExtension>
</configurator>
For further guidance, save this file as MyCluster.xml in the sample directory.
Add the cluster description file to the data model definition file and run the ZAP tool
The data model definition file contains all the cluster XML locations and manufacturers list. To work with the new custom cluster, you need to append it to the list in the existing data model definition file.
You can use the zap-gui command to add the cluster and run the ZAP tool, or zap-append command to add the cluster only without starting the ZAP tool. This guide focuses on the zap-gui command.
Run the following command:
west zap-gui -j src/default_zap/zcl.json --clusters ./MyCluster.xml
This example command copies the original
<default Matter SDK location>/src/app/zap-templates/zcl/zcl.jsonfile, adds theMyCluster.xmlcluster, and saves the newzcl.jsonfile in the sample directory. The newly generatedzcl.jsonfile is used as an input to the ZAP tool.Note
Execute the command from your application’s directory as the ZAP tool searches recursively for the
.zapfiles in the current directory.Add an endpoint with the new device type in the ZAP tool.
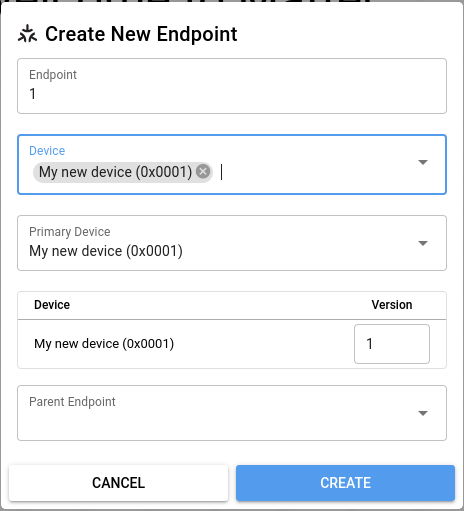
Endpoint with My new device in ZAP tool
Locate the new cluster in the ZAP tool.
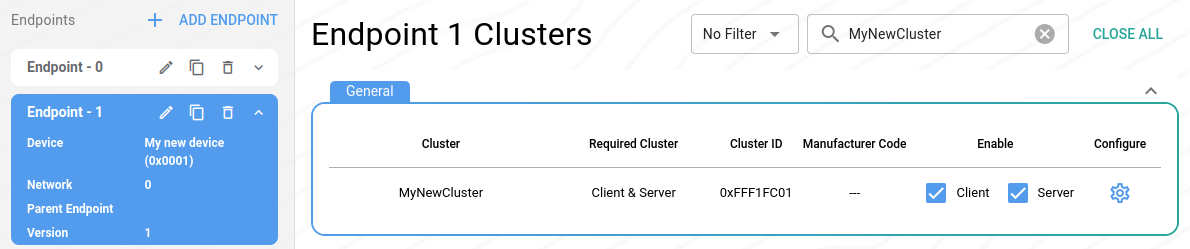
New custom cluster in ZAP tool
Choose whether the cluster should be enabled for the Client and Server sides.
Click the gear icon to open the cluster configuration and enable the attributes, commands, and events.
In the Attributes tab, ensure that you have the required attributes enabled.
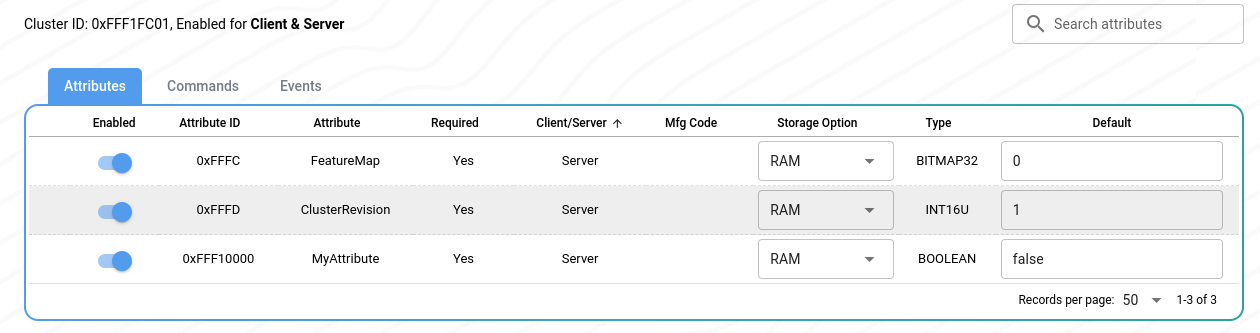
Attributes of the new custom cluster in ZAP tool
In the Commands tab, ensure that you have the required commands enabled.

Commands of the new custom cluster in ZAP tool
In the Events tab, ensure that you have the required events enabled.

Events of the new custom cluster in ZAP tool
Save the file and exit.
Generate the C++ code that contains the selected clusters
Run the following command to use the modified ZAP file to generate the C++ code that contains the selected clusters:
west zap-generate --full
Add the -j or --zcl-json argument to the command to specify the path to the zcl.json file if the file is not stored in the sample_directory/src/default_zap/ subdirectory.
For example:
west zap-generate --full -j ./zcl.json
Important
In the nRF Connect SDK versions older than 3.2.0, the zcl.json had to be stored in the sample_directory/src/default_zap/ subdirectory.
After completing these steps, the following changes will be visible within your sample directory:
The new cluster description file
MyCluster.xml.The updated data model definition file
zcl.jsonwith the new cluster and relative paths to the Matter data model directory.The generated C++ source files for the new cluster.
The updated
.zapfile with the new cluster configuration and relative path to thezcl.jsonfile.
Once the new cluster is added to the Matter application, you can call the zap-gui command without the additional --clusters argument.
However, you still need to provide the path to the zcl.json file if you created a new one in a location different from the default one.
Align the configuration with the new cluster
Generating the .zap files with the --full option creates new source files under zap-generated/app-common.
They need to override the default files located in the Matter SDK in the zzz_generated/app-common directory.
To override the path, set the CONFIG_CHIP_APP_ZAP_DIR option in the prj.conf file to the "${APPLICATION_CONFIG_DIR}/src/default_zap/zap-generated" value, pointing to the parent of the generated app-common directory, and set the CHIP_APP_ZAP_DIR variable in the CMakeLists.txt file.
As custom clusters are not part of the default Matter SDK, you need to additionally pass a list of all new cluster names in an EXTERNAL_CLUSTERS argument when calling ncs_configure_data_model.
The following code snippet shows how to modify the Matter template CMakeLists.txt file with the new cluster:
project(matter-template)

# Override zap-generated directory.
include(${ZEPHYR_NRF_MODULE_DIR}/samples/matter/common/cmake/zap_helpers.cmake)
ncs_get_zap_parent_dir(ZAP_PARENT_DIR)

get_filename_component(CHIP_APP_ZAP_DIR ${ZAP_PARENT_DIR}/zap-generated REALPATH CACHE)

# Existing code in CMakeList.txt

ncs_configure_data_model(
   EXTERNAL_CLUSTERS "MY_NEW_CLUSTER" # Add EXTERNAL_CLUSTERS flag
)

# NORDIC SDK APP END
If you want to add more than one cluster custom cluster, you need to add all of them to the EXTERNAL_CLUSTERS argument.
For example:
ncs_configure_data_model(
   EXTERNAL_CLUSTERS "MY_NEW_CLUSTER" "MY_NEW_CLUSTER_2"
)
Implement all the required commands in the application code
You must implement the newly defined commands as a dedicated function in the application code to reflect the cluster functionality.
Name the function by combining the emberAf prefix, cluster name, command name, and Callback suffix.
The function must return a boolean value, and it takes the following parameters:
CommandHandler *commandObj- The command handler.const ConcreteCommandPath &commandPath- The command path.const <command name>::DecodableType &commandData- The command arguments, where<command name>is the name of the command.
For example, if you define the following command in the MyCluster.xml file:
<command source="client" code="0xFFF10000" name="MyCommand" optional="false">
   <description>Command that takes two uint8 arguments and returns their sum.</description>
   <arg name="arg1" type="int8u"/>
   <arg name="arg2" type="int8u"/>
</command>
Then, you need to implement the following command in the application code:
#include <app-common/zap-generated/callback.h>

bool emberAfMyNewClusterClusterMyCommandCallback(chip::app::CommandHandler *commandObj, const chip::app::ConcreteCommandPath &commandPath,
                                                 const chip::app::Clusters::MyNewCluster::Commands::MyCommand::DecodableType &commandData)
{
   // TODO: Implement the command.
}

void MatterMyNewClusterPluginServerInitCallback()
{
   // TODO: Implement the plugin server init callback.
}
Implement the extension handling in the application code
The way you handle cluster extensions depends on whether the cluster that you want to extend is implemented using the code-driven approach or with ZAP-generated code.
If the cluster is implemented using the code-driven approach, you must inherit from this cluster delegate class and implement the methods to handle the customized part.
Then, you must unregister the original cluster delegate and register the customized one.
For example, if you want to extend the BasicInformation cluster, you need to implement it in the application code as follows:
Inherit from the
BasicInformationClusterclass and override the methods to handle the customized part.#include <app/clusters/basic-information/BasicInformationCluster.h> #include <app/server-cluster/ServerClusterContext.h> #include <app/server-cluster/ServerClusterInterface.h> class BasicInformationExtension : public chip::app::Clusters::BasicInformationCluster { public: BasicInformationExtension() {} /* Overrides the default BasicInformationCluster implementation. */ chip::app::DataModel::ActionReturnStatus ReadAttribute(const chip::app::DataModel::ReadAttributeRequest &request, chip::app::AttributeValueEncoder &encoder) override; CHIP_ERROR Attributes(const chip::app::ConcreteClusterPath &path, chip::ReadOnlyBufferBuilder<chip::app::DataModel::AttributeEntry> &builder) override; CHIP_ERROR AcceptedCommands(const chip::app::ConcreteClusterPath &path, chip::ReadOnlyBufferBuilder<chip::app::DataModel::AcceptedCommandEntry> &builder) override; CHIP_ERROR GeneratedCommands(const chip::app::ConcreteClusterPath &path, chip::ReadOnlyBufferBuilder<chip::app::DataModel::GeneratedCommandEntry> &builder) override; CHIP_ERROR Attributes(const chip::app::ConcreteClusterPath &path, chip::ReadOnlyBufferBuilder<chip::app::DataModel::AttributeEntry> &builder) override; chip::app::DataModel::ActionReturnStatus SetExtendedAttribute(bool newExtendedAttribute); private: bool mExtendedAttribute; };
Implement the body of overridden methods to handle the custom attributes, commands and events.
#include <app/util/attribute-storage.h>
#include <clusters/BasicInformation/Events.h>
#include <clusters/BasicInformation/Metadata.h>

using namespace chip;
using namespace chip::app;

constexpr AttributeId kExtendedAttributeId = 0x17;

constexpr DataModel::AttributeEntry kExtraAttributeMetadata[] = {
   { kExtendedAttributeId,
   {} /* qualities */,
   Access::Privilege::kView /* readPriv */,
   std::nullopt /* writePriv */ },
};

DataModel::ActionReturnStatus BasicInformationExtension::SetExtendedAttribute(bool newExtendedAttribute)
{
   mExtendedAttribute = newExtendedAttribute;
   return CHIP_NO_ERROR;
}

DataModel::ActionReturnStatus BasicInformationExtension::ReadAttribute(const DataModel::ReadAttributeRequest &request,
                               AttributeValueEncoder &encoder)
{
   switch (request.path.mAttributeId) {
   case kExtendedAttributeId:
      return encoder.Encode(mExtendedAttribute);
   default:
      return chip::app::Clusters::BasicInformationCluster::ReadAttribute(request, encoder);
   }
}

DataModel::ActionReturnStatus BasicInformationExtension::WriteAttribute(const DataModel::WriteAttributeRequest &request,
                            AttributeValueDecoder &decoder)
{
   switch (request.path.mAttributeId) {
   case kExtendedAttributeId:
      bool newExtendedAttribute;
      ReturnErrorOnFailure(decoder.Decode(newExtendedAttribute));
      return NotifyAttributeChangedIfSuccess(request.path.mAttributeId, SetExtendedAttribute(newExtendedAttribute));
   default:
      return chip::app::Clusters::BasicInformationCluster::WriteAttribute(request, decoder);
   }
}

CHIP_ERROR BasicInformationExtension::Attributes(const ConcreteClusterPath &path,
                  ReadOnlyBufferBuilder<DataModel::AttributeEntry> &builder)
{
   ReturnErrorOnFailure(builder.ReferenceExisting(kExtraAttributeMetadata));

   return chip::app::Clusters::BasicInformationCluster::Attributes(path, builder);
}

CHIP_ERROR BasicInformationExtension::AcceptedCommands(const ConcreteClusterPath &path,
                         ReadOnlyBufferBuilder<DataModel::AcceptedCommandEntry> &builder)
{
   /* The BasicInformationCluster does not have any commands, so it is not necessary to call the implementation of the base class. */
   static constexpr DataModel::AcceptedCommandEntry kAcceptedCommands[] = {
      Clusters::BasicInformation::Commands::ExtendedCommand::kMetadataEntry
   };
   return builder.ReferenceExisting(kAcceptedCommands);
}

std::optional<DataModel::ActionReturnStatus>
BasicInformationExtension::InvokeCommand(const DataModel::InvokeRequest &request, chip::TLV::TLVReader &input_arguments,
                CommandHandler *handler)
{
   switch (request.path.mCommandId) {
   case Clusters::BasicInformation::Commands::ExtendedCommand::Id: {
      /* Implement the command handling logic here */
   }
   default:
      /* The BasicInformationCluster does not have any commands, so it is not necessary to call the implementation of the base class. */
      return Protocols::InteractionModel::Status::UnsupportedCommand;
   }
}
Unregister the original cluster delegate and register the customized one.
#include <data-model-providers/codegen/CodegenDataModelProvider.h> /* Replaces the registered BasicInformation cluster with a customized one that adds random number handling. */ auto ®istry = chip::app::CodegenDataModelProvider::Instance().Registry(); ServerClusterInterface *interface = registry.Get({ kRootEndpointId, chip::app::Clusters::BasicInformation::Id }); VerifyOrDie(interface != nullptr); registry.Unregister(interface); static RegisteredServerCluster<BasicInformationExtension> sBasicInformationExtension; VerifyOrDie(registry.Register(sBasicInformationExtension.Registration()) == CHIP_NO_ERROR);
If the cluster is implemented with ZAP-generated code, you must implement the required extension callbacks by defining the appropriate emberAf...Callback functions, as described in the code examples and in the cluster XML.
For example, if you want to extend the LevelControl cluster with the ExtendedCommand command, you need to implement it in the application code as follows:
#include <app-common/zap-generated/callback.h>

bool emberAfLevelControlClusterExtendedCommandCallback(chip::app::CommandHandler *commandObj, const chip::app::ConcreteCommandPath &commandPath,
                                                                           const chip::app::Clusters::BasicInformation::Commands::ExtendedCommand::DecodableType &commandData)
{
   // TODO: Implement the command.
}
Synchronizing the ZAP files with the new Matter SDK
If you want to update the Matter SDK revision in your project and you have custom clusters or device types in your project, you need to call the zap-sync command with the additional -j and --clusters arguments.
This command updates the .zap file with all required changes from the new Matter SDK Device Type Library Specification and the zcl.json file with the new cluster and relative paths to the Matter data model directory.
This is needed especially when you notice an issue with opening the ZAP tool GUI.