Bluetooth: Peripheral LBS
The peripheral LBS sample demonstrates how to use the LED Button Service (LBS).
Requirements
The sample supports the following development kits:
Hardware platforms |
PCA |
Board name |
|
|---|---|---|---|
PCA20053 |
|
||
nRF54LV10 DK |
PCA10188 |
|
|
nRF54LS05 DK |
PCA10214 |
nrf54ls05dk |
|
PCA10184 |
|
||
nRF54LC10 DK |
PCA10226 |
nrf54lc10dk |
|
PCA20072 |
|
||
PCA10156 |
|
||
PCA10156 |
|
||
PCA10156 |
|
||
PCA10175 |
|
||
PCA10095 |
|
||
PCA10040 |
|
||
PCA10040 |
|
||
PCA10040 |
|
||
PCA10056 |
|
||
PCA10056 |
|
||
PCA10100 |
|
For more security, it is recommended to use the */ns variant of the board target.
When built for this variant, the sample is configured to compile and run as a non-secure application using security by separation.
Therefore, it automatically includes Trusted Firmware-M that prepares the required peripherals and secure services to be available for the application.
The sample also requires a smartphone or tablet running a compatible mobile application. The Testing instructions refer to nRF Connect for Mobile and nRF Blinky, but you can also use other similar applications, such as nRF Toolbox.
Note
If you build this application for Thingy:53, it enables additional features. See Application guide for Thingy:53 for details.
Overview
You can use the sample to transmit the button state from your development kit to another device.
When connected, the sample sends the state of Button 1 on the development kit to the connected device, such as a phone or tablet. The mobile application on the device can display the received button state and control the state of LED 3 on the development kit.
When connected, the sample sends the state of Button 0 on the development kit to the connected device, such as a phone or tablet. The mobile application on the device can display the received button state and control the state of LED 2 on the development kit.
When connected, the sample sends the state of Button 1 on the development kit to the connected device, such as a phone or tablet. The mobile application on the device can display the received button state and control the state of BLUE channel of LED 1 on the development kit.
You can also use this sample to control the color of the RGB LED on the nRF52840 Dongle or Thingy:53.
User interface
The user interface of the sample depends on the hardware platform you are using.
- LED 1:
Blinks when the main loop is running (that is, the device is advertising) with a period of two seconds, duty cycle 50%.
- LED 2:
Lit when the development kit is connected.
- LED 3:
Lit when the development kit is controlled remotely from the connected device.
- Button 1:
Send a notification with the button state: “pressed” or “released”.
- LED 0:
Blinks when the main loop is running (that is, the device is advertising) with a period of two seconds, duty cycle 50%.
- LED 1:
Lit when the development kit is connected.
- LED 2:
Lit when the development kit is controlled remotely from the connected device.
- Button 0:
Send a notification with the button state: “pressed” or “released”.
- RED channel of LED 1:
Blinks when the main loop is running (that is, the device is advertising) with a period of two seconds and a duty cycle of 50%.
- GREEN channel of LED 1:
Lit when the development kit is connected.
- RGB LED:
The RGB LED channels are used independently to display the following information:
Red - If the main loop is running (that is, the device is advertising). The LED blinks with a period of two seconds, duty cycle 50%.
Green - If the device is connected.
Blue - If user set the LED using Nordic LED Button Service.
For example, if Thingy:53 is connected over Bluetooth, the LED color toggles between green and yellow. The green LED channel is kept on and the red LED channel is blinking.
- Button 1:
Send a notification with the button state: “pressed” or “released”.
- Green LED:
Blinks, toggling on/off every second, when the main loop is running and the device is advertising.
- RGB LED:
The RGB LED channels are used independently to display the following information:
Red - If Dongle is connected.
Green - If user set the LED using Nordic LED Button Service.
- Button 1:
Send a notification with the button state: “pressed” or “released”.
Building and running
This sample can be found under samples/bluetooth/peripheral_lbs in the nRF Connect SDK folder structure.
For more security, it is recommended to use the */ns variant of the board target (see the Requirements section above.)
When built for this variant, the sample is configured to compile and run as a non-secure application using security by separation.
Therefore, it automatically includes Trusted Firmware-M that prepares the required peripherals and secure services to be available for the application.
To build the sample, follow the instructions in Building an application for your preferred building environment. See also Programming an application for programming steps and Testing and optimization for general information about testing and debugging in the nRF Connect SDK.
Note
When building repository applications in the SDK repositories, building with sysbuild is enabled by default.
If you work with out-of-tree freestanding applications, you need to manually pass the --sysbuild parameter to every build command or configure west to always use it.
Note
To flash the nRF54L15 TAG, you need to plug into the DEBUG IN header on the nRF54L15 DK.
TAG is not powered through that header, therefore, you must install the CR2032 cell.
Minimal build
You can build the sample with a minimum configuration as a demonstration of how to reduce code size and RAM usage, using the -DFILE_SUFFIX=minimal flag in your build.
See Providing CMake options for instructions on how to add this option to your build. For example, when building on the command line, you can add the option as follows:
west build samples/bluetooth/peripheral_lbs -- -DFILE_SUFFIX=minimal
Testing
After programming the sample to your dongle or development kit, one of the LEDs starts blinking to indicate that the advertising loop is active (see User interface for details).
To test the sample using the nRF Connect for Mobile application, complete the following steps:
Install and start the nRF Connect for Mobile application on your smartphone or tablet.
Power on the development kit or insert your dongle into the USB port.
Connect to the device from the application. The device is advertising as
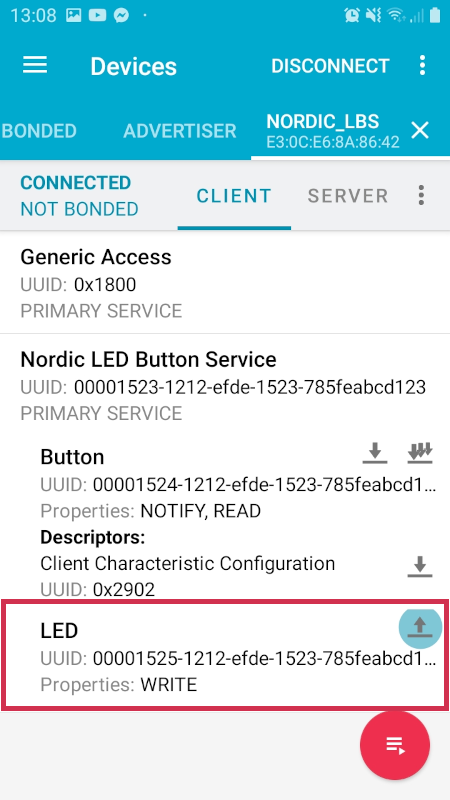
Nordic_LBS. The services of the connected device are shown.In Nordic LED Button Service, enable notifications for the Button characteristic, using the downward arrow icon.
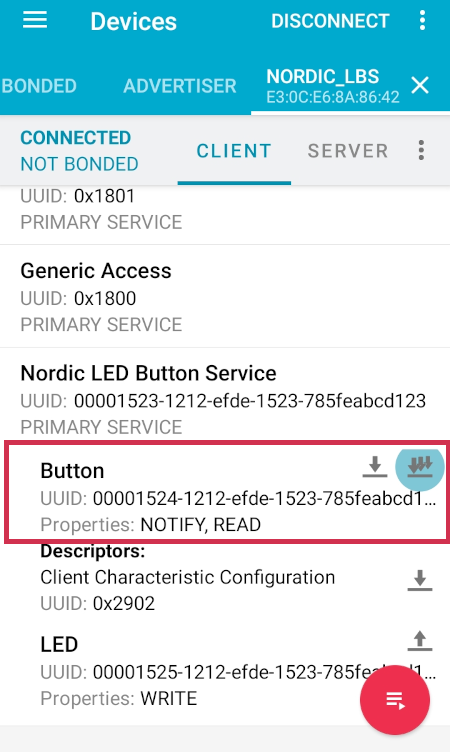
Press Button 1 on the device.
Observe that notifications with the following values are displayed:
Button releasedwhen Button 1 is released.Button pressedwhen Button 1 is pressed.
Write the following values to the LED characteristic in the Nordic LED Button Service, using the up arrow icon.
Depending on the hardware platform, this produces results described in the table.
Hardware platform
Value
Effect
nRF52 and nRF53 DKs
OFFSwitch the LED 3 off.
ONSwitch the LED 3 on.
nRF52840 Dongle
OFFSwitch the green channel of the RGB LED off.
ONSwitch the green channel of the RGB LED on.
Thingy:53
OFFSwitch the blue channel of the RGB LED off.
ONSwitch the blue channel of the RGB LED on.
Note
The nRF54 DKs use a different numbering pattern for LED and buttons. See the User interface section for full overview.
Install and start the nRF Connect for Mobile application on your smartphone or tablet.
Power on the development kit or insert your dongle into the USB port.
Connect to the device from the application. The device is advertising as
Nordic_LBS. The services of the connected device are shown.In Nordic LED Button Service, enable notifications for the Button characteristic, using the downward arrow icon.
Press Button 0 on the device.
Observe that notifications with the following values are displayed:
Button releasedwhen Button 0 is released.Button pressedwhen Button 0 is pressed.
Write the following values to the LED characteristic in the Nordic LED Button Service, using the up arrow icon.
Depending on the hardware platform, this produces results described in the table.
Hardware platform
Value
Effect
nRF54 DKs
OFFSwitch the LED 2 off.
ONSwitch the LED 2 on.
To test the sample using the nRF Blinky mobile app, see the nRF Blinky documentation.
Dependencies
This sample uses the following nRF Connect SDK libraries:
In addition, it uses the following Zephyr libraries:
include/zephyr/types.hlib/libc/minimal/include/errno.hinclude/sys/printk.hinclude/sys/byteorder.hAPI:
include/bluetooth/bluetooth.hinclude/bluetooth/hci.hinclude/bluetooth/conn.hinclude/bluetooth/uuid.hinclude/bluetooth/gatt.h
The sample also uses the following secure firmware component: