nRF RPC: Protocols serialization server
The Protocols serialization server sample demonstrates how to receive remote procedure calls (RPCs) from a client device, such as one running the Protocols serialization client sample. The RPCs are used to control OpenThread, Bluetooth® LE, and NFC stacks running on the server device. The client and server devices use the Remote procedure call library (nRF RPC) and the nRF RPC UART transport to communicate with each other.
Requirements
The sample supports the following development kits:
Hardware platforms |
PCA |
Board name |
|
|---|---|---|---|
PCA10184 |
|
||
PCA10156 |
|
||
PCA10056 |
|
To test the sample, you also need another device running the Protocols serialization client sample.
For testing the Bluetooth LE API serialization, you need the nRF Connect for Mobile app installed on your smartphone or tablet.
For testing the NFC API serialization, you need a smartphone or tablet that can read NFC tags.
Overview
The Protocols serialization server sample runs full OpenThread, Bluetooth® LE, and NFC stacks, depending on the selected configuration. The sample exposes selected functions from these stacks over UART, using the Remote procedure call library (nRF RPC). The remote procedure call arguments and return values are encoded using CBOR.
Configuration
See Configuring and building for information about how to permanently or temporarily change the configuration.
Additional configuration files
You can configure the sample using additional Kconfig fragments (.conf) and devicetree overlays (.overlay) passed to the build system.
Use EXTRA_CONF_FILE to apply extra Kconfig fragments and EXTRA_DTC_OVERLAY_FILE to apply extra devicetree overlays.
When multiple files are provided, separate them with ;.
Examples:
Enable verbose logging and asserts:
west build -b nrf54l15dk/nrf54l15/cpuapp -- \
  -DEXTRA_CONF_FILE=verbose.conf
Enable MPSL software coexistence (coex):
west build -b nrf54l15dk/nrf54l15/cpuapp -- \
  -DEXTRA_CONF_FILE=coex.conf \
  -DEXTRA_DTC_OVERLAY_FILE=coex.overlay
Optional configuration files shipped with this sample:
verbose.conf- Development-oriented options: asserts, UART logging, and DBG log levels.log_rpc.conf- Enables Logging over RPC and core dump support used by the client to retrieve crash logs.ble.conf- Enables the server part of the Bluetooth LE RPC.openthread.conf- Enables the server part of the OpenThread RPC and required OpenThread features.nfc.conf- Enables the server part of the NFC RPC.coex.conf- Enables MPSL Software Coexistence. Use together with thecoex.overlayfile (pass it via EXTRA_DTC_OVERLAY_FILE).
User interface
Button 1:
When the
log_rpc.conffile is provided, triggers a fatal error. This is used for testing the core dump feature.Otherwise: not available.
Button 0:
When the
log_rpc.conffile is provided, triggers a fatal error. This is used for testing the core dump feature.Otherwise: not available.
Building and running
This sample can be found under samples/nrf_rpc/protocols_serialization/server in the nRF Connect SDK folder structure.
To build the sample, follow the instructions in Building an application for your preferred building environment. See also Programming an application for programming steps and Testing and optimization for general information about testing and debugging in the nRF Connect SDK.
Note
When building repository applications in the SDK repositories, building with sysbuild is enabled by default.
If you work with out-of-tree freestanding applications, you need to manually pass the --sysbuild parameter to every build command or configure west to always use it.
Testing
After building the Protocols serialization server sample and programming it to your development kit, connect it to a second device running the Protocol serialization client sample to test either the Bluetooth LE, OpenThread or NFC functionality.
Note
When using the nRF54L15 DK or nRF54LM20 DK, do not press Button 1 or Button 2. The GPIO pins connected to these buttons are used by the UART peripheral for communication with the client device.
Connecting the client and server samples
The client and server samples use two UART peripherals. One peripheral is used for shell and logging purposes, similarly to other applications and samples, while the other peripheral is used for sending and receiving remote procedure calls (RPCs).
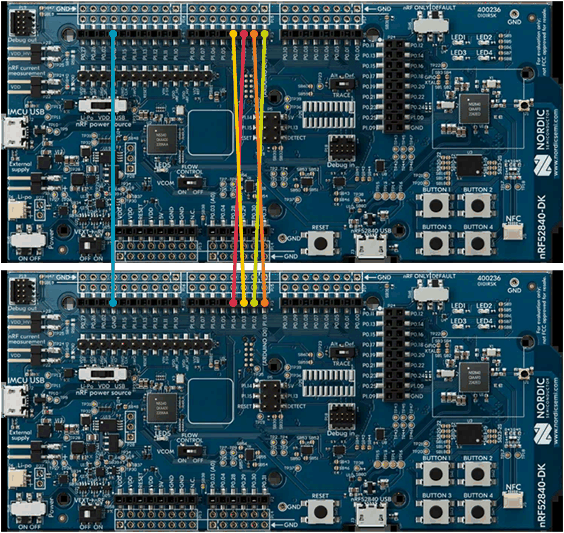
By default, the nRF52840 DK uses the uart0 peripheral for shell and logging purposes, and the uart1 peripheral for sending and receiving remote procedure calls (RPCs).
The uart1 peripheral is configured to use the following pins:
Server |
Client |
Function on server |
|---|---|---|
P1.1 |
P1.2 |
RX |
P1.2 |
P1.1 |
TX |
P1.3 |
P1.4 |
RTS (hardware flow control) |
P1.4 |
P1.3 |
CTS (hardware flow control) |
GND |
GND |
Ground |
To enable the communication between the client and the server devices, connect the pins on the two nRF52840 DKs using jumper wires. The following illustration demonstrates the pin connections:
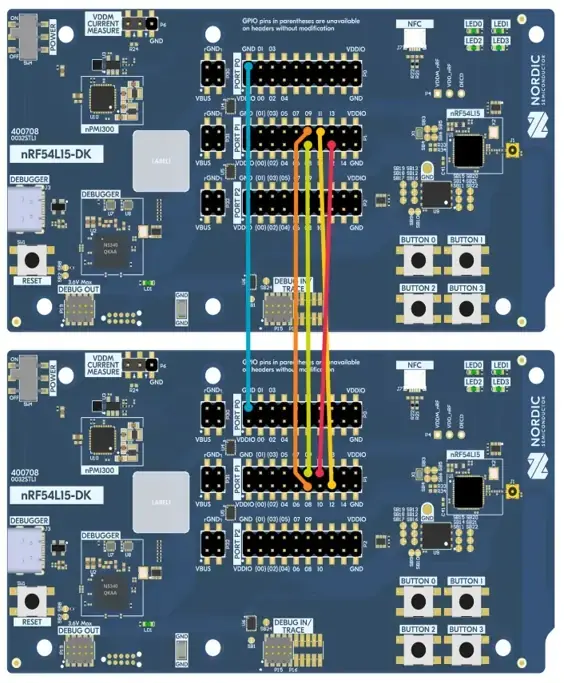
By default, the nRF54L15 DK uses the uart20 peripheral for shell and logging purposes, and the uart21 peripheral for sending and receiving remote procedure calls (RPCs).
The uart21 peripheral is configured to use the following pins:
Server |
Client |
Function on server |
|---|---|---|
P1.9 |
P1.8 |
RX |
P1.8 |
P1.9 |
TX |
P1.11 |
P1.12 |
RTS (hardware flow control) |
P1.12 |
P1.11 |
CTS (hardware flow control) |
GND |
GND |
Ground |
To enable the communication between the client and the server devices, connect the pins on the two nRF54L15 DKs using jumper wires. The following illustration demonstrates the pin connections:
By default, the nRF54LM20 DK uses the uart20 peripheral for shell and logging purposes, and the uart21 peripheral for sending and receiving remote procedure calls (RPCs).
The uart21 peripheral is configured to use the following pins:
Server |
Client |
Function on server |
|---|---|---|
P1.9 |
P1.8 |
RX |
P1.8 |
P1.9 |
TX |
P1.11 |
P1.12 |
RTS (hardware flow control) |
P1.12 |
P1.11 |
CTS (hardware flow control) |
GND |
GND |
Ground |
To enable the communication between the client and the server devices, connect the pins on the two nRF54LM20 DKs using jumper wires.
Testing Bluetooth LE API serialization
Complete the following steps to test Bluetooth LE API serialization:
Connect to both kits with a terminal emulator (for example, the Serial Terminal app). See Testing and optimization for the required settings and steps.
Reboot both devices at the same time by pressing the RESET button on each DK.
Wait a few seconds until you see a message similar to the following on both terminal emulators:
[00:00:00.842,862] <inf> nrf_rpc_host: RPC client readyThis indicates that the communication between the devices has been initialized properly.
Run the following command on the client’s terminal emulator to start Bluetooth LE advertising:
uart:~$ bt init
uart:~$ bt advertise on
Start the nRF Connect for Mobile app on your smartphone or tablet.
Connect to the client device from the nRF Connect app.
The device is advertising as Nordic_PS.
Observe a message similar to the following on the client’s terminal emulator:
LE conn param updated: int 0x0027 lat 0 to 42Send data over the RX characteristic of the UART service using the nRF Connect app.
Observe a message similar to the following on the client’s terminal emulator:
bt_nus: on_receive: Received data, handle 0, conn 0x200023c4
Testing OpenThread API serialization
Complete the following steps to test OpenThread API serialization:
Connect to both kits with a terminal emulator (for example, the Serial Terminal app). See Testing and optimization for the required settings and steps.
Reboot both devices at the same time using the RESET button on each DK.
Wait a few seconds until you see a message similar to the following on both terminal emulators:
uart:~$ [00:00:03.392,517] <dbg> NRF_RPC: nrf_rpc_init: Done initializing nRF RPC module
This indicates that the communication between the devices has been initialized properly.
Run the following command on the client’s terminal emulator to bring up the OpenThread interface on the server device:
uart:~$ ot ifconfig up
Done
[00:02:28.980,041] <dbg> NRF_RPC: cmd_ctx_alloc: Command context 0 allocated
[00:02:28.980,102] <dbg> NRF_RPC: nrf_rpc_cmd_common: Sending command 0x00 from group 0x01
[00:02:28.980,133] <dbg> nrf_rpc_uart: send: Sending frame
                                       80 00 ff 01 01 f6
...
Run the following command on the client’s terminal emulator to bring up the corresponding Zephyr network interface on the client device:
uart:~$ net iface up 1
Interface 1 is up
Verify that the Zephyr network interface has been automatically configured with OpenThread’s link-local address:
uart:~$ ot ipaddr
fe80:0:0:0:6c26:956a:813:1e33
Done
...

uart:~$ net iface  show

Interface net0 (0x200012c8) (<unknown type>) [1]
=========================================
MTU       : 1280
Flags     : NO_AUTO_START,IPv6,NO_ND,NO_MLD
Device    : ot_rpc (0x2b748)
IPv6 unicast addresses (max 5):
      fe80::6c26:956a:813:1e33 autoconf preferred infinite
Start Thread and become a leader:
uart:~$ ot thread start
Done
...

uart:~$ ot state leader
Done
Verify that the Zephyr network interface has automatically received OpenThread’s mesh-local addresses:
uart:~$ net iface show

Interface net0 (0x200012c8) (<unknown type>) [1]
=========================================
MTU       : 1280
Flags     : NO_AUTO_START,IPv6,NO_ND,NO_MLD
Device    : ot_rpc (0x2b748)
IPv6 unicast addresses (max 5):
      fe80::6c26:956a:813:1e33 autoconf preferred infinite
      fdde:ad00:beef:0:e503:abfd:1c8d:2664 autoconf preferred infinite meshlocal
This happens because the client registers a notification callback for OpenThread state changes at the server device and it continuously refreshes the client’s IPv6 address list when that changes on the server side.
Retrieve the operational dataset of the Thread network:
uart:~$ ot dataset active -x
0e080000000000000000000300000b35060004001fffe00208dead00beef00cafe0708fddead00beef00000510f7893f15a55d8adeacad288c38bf32cc030a4f70656e546872656164010240120410d48d777a474f80e61aa5680de764bd6d0c0402a0f7f8
Done
To send a UDP packet to a peer device and UDP port 5555, run the following command:
uart:~$ net udp send fe80:0:0:0:6c26:956a:813:1e34 5555 AAAA
Message sent
To open the UDP port 5555 and listen for incoming UDP datagrams from peer devices, run the following command:
uart:~$ net udp bind fe80:0:0:0:6c26:956a:813:1e33 5555
Note that all IPv6 addresses shown here are just examples and will be replaced with the actual IPv6 addresses of the peer devices.
Testing NFC API serialization
Connect to both kits with a terminal emulator (for example, the Serial Terminal app). See Testing and optimization for the required settings and steps.
Reboot both devices at the same time by pressing the RESET button on each DK.
Wait a few seconds until you see a message similar to the following on both terminal emulators:
[00:00:00.842,862] <inf> nrf_rpc_host: RPC client readyThis indicates that the communication between the devices has been initialized properly.
Run the following commands on the client’s terminal emulator to bring up NFC interface on the server device:
uart:~$ nfc init
uart:~$ nfc start
Start any application on smartphone or tablet that is able to read NFC tags.
Touch the NFC antenna with the smartphone or tablet and observe it displays the encoded text
Hello world!.Run the following commands on the client’s terminal emulator to set and encode a custom message on the server device:
uart:~$ nfc stop
uart:~$ nfc set_new_msg "https://www.nordicsemi.com/Products/Development-software/nRF-Connect-SDK"
uart:~$ nfc start
Touch the NFC antenna with the smartphone or tablet and observe it displays the custom message as the encoded text.
Run the following commands on the client’s terminal emulator to stop and to release NFC frontend on the server device:
uart:~$ nfc stop
uart:~$ nfc release
Dependencies
This sample uses the following sdk-nrfxlib libraries: