Bluetooth: Central HIDS
The Central HIDS sample demonstrates how to use the GATT Human Interface Device Service (HIDS) Client to interact with a HIDS server. Basically, the sample simulates a computer that connects to a mouse or a keyboard.
Note
Apart from HID samples, the nRF Connect SDK provides a complete reference application design of Human Interface Device (HID). Depending on the configuration, the application can work as a desktop mouse, gaming mouse, keyboard, or connection dongle. It supports connection over Bluetooth® LE, USB, or both. For details, see the nRF Desktop documentation.
Requirements
The sample supports the following development kits:
Hardware platforms |
PCA |
Board name |
|
|---|---|---|---|
nRF54LV10 DK |
PCA10188 |
|
|
nRF54LS05 DK |
PCA10214 |
nrf54ls05dk |
|
PCA10184 |
|
||
nRF54LC10 DK |
PCA10226 |
nrf54lc10dk |
|
PCA10156 |
|
||
PCA10156 |
|
||
PCA10156 |
|
||
PCA10175 |
|
||
PCA10095 |
|
||
PCA10040 |
|
||
PCA10056 |
|
For more security, it is recommended to use the */ns variant of the board target.
When built for this variant, the sample is configured to compile and run as a non-secure application using security by separation.
Therefore, it automatically includes Trusted Firmware-M that prepares the required peripherals and secure services to be available for the application.
The sample also requires a HIDS device to connect with (for example, another development kit running the Bluetooth: Peripheral HIDS mouse sample or Bluetooth: Peripheral HIDS keyboard sample, or a computer with a Bluetooth Low Energy dongle and the Bluetooth Low Energy app).
Overview
The sample scans available devices, searching for a HIDS server. If a HIDS server is found, the sample connects to it and discovers all characteristics.
If any input reports are detected, the sample subscribes to them to receive notifications. If any boot reports are detected, the behavior depends on if they are boot mouse reports or boot keyboard reports:
If a boot mouse report is detected, the sample subscribes to it.
If a boot keyboard report is detected, the sample subscribes to its input report, and the sample functionality of changing the CAPSLOCK LED is enabled (Button 1 and Button 3).
If a boot mouse report is detected, the sample subscribes to it.
If a boot keyboard report is detected, the sample subscribes to its input report, and the sample functionality of changing the CAPSLOCK LED is enabled (Button 0 and Button 2).
Continuous report receiving
The continuous report receiving feature is enabled by default.
You can toggle it off using the CONFIG_SAMPLE_BT_CENTRAL_HIDS_CONTINUOUS_REPORT_RX Kconfig option.
If the connected device sends GATT notifications with HID input reports fast enough, the sample automatically enters the continuous report receiving mode.
In that mode, the sample stops printing every notification payload on the UART.
It prints a short summary every CONFIG_SAMPLE_BT_CENTRAL_HIDS_CONTINUOUS_REPORT_RX_STATS_RATE reports, allowing you to assess the quality of the communication.
Enter - After each group of 10 reports, if their time span is shorter than one second, the continuous mode turns on.
Exit - If no report is received for 500 milliseconds, the continuous mode turns off and per-notification logging resumes.
To test the continuous report receiving feature, run the Bluetooth: Peripheral HIDS mouse sample with the CONFIG_SAMPLE_BT_HIDS_CONTINUOUS_REPORT_SENDING Kconfig option enabled.
After pairing, hold one of the buttons on the DK that is running the Bluetooth: Peripheral HIDS mouse for more than two seconds to enter the continuous report sending mode.
The central will then automatically enter the continuous report receiving mode.
User interface
- Button 1:
Toggle the CAPSLOCK LED on the connected keyboard using Write without response. This function is available only if the connected keyboard is set to work in Boot Protocol Mode.
When pairing, press this button to confirm the passkey value that is printed on the COM listener to pair with the other device.
- Button 2:
Switch between Boot Protocol Mode and Report Protocol Mode. This function is available only if the connected peer supports the Protocol Mode Characteristic.
When pairing, press this button to reject the passkey value that is printed on the COM listener to prevent pairing with the other device.
- Button 3:
Toggle the CAPSLOCK LED on the connected keyboard using Write with response. This function is available only if the connected HID has boot keyboard reports. It always writes CAPSLOCK information to the boot report, even if Report Protocol Mode is selected.
- Button 4:
Switch to the “Alternative button functions” mode. In this mode, the buttons have different functionalities than in the normal mode. The available functionalities depend on the sample configuration and are printed in the terminal window after button press.
Currently, the following functionalities are available:
Button 1: Resume scanning.
Button 2: Request the next HID SCI mode. Only available if
CONFIG_BT_HOGP_SCIis enabled.Button 4: Exit the “Alternative button functions” mode.
- Button 0:
Toggle the CAPSLOCK LED on the connected keyboard using Write without response. This function is available only if the connected keyboard is set to work in Boot Protocol Mode.
When pairing, press this button to confirm the passkey value that is printed on the COM listener to pair with the other device.
- Button 1:
Switch between Boot Protocol Mode and Report Protocol Mode. This function is available only if the connected peer supports the Protocol Mode Characteristic.
When pairing, press this button to reject the passkey value that is printed on the COM listener to prevent pairing with the other device.
- Button 2:
Toggle the CAPSLOCK LED on the connected keyboard using Write with response. This function is available only if the connected HID has boot keyboard reports. It always writes CAPSLOCK information to the boot report, even if Report Protocol Mode is selected.
- Button 3:
Switch to the “Alternative button functions” mode. In this mode, the buttons have different functionalities than in the normal mode. The available functionalities depend on the sample configuration and are printed in the terminal window after button press.
Currently, the following functionalities are available:
Button 0: Resume scanning.
Button 1: Request the next HID SCI mode. Only available if
CONFIG_BT_HOGP_SCIis enabled.Button 3: Exit the “Alternative button functions” mode.
Configuration
See Configuring and building for information about how to permanently or temporarily change the configuration.
Configuration options
The following sample-specific Kconfig options are used in this sample (defined in samples/bluetooth/central_hids/Kconfig):
- CONFIG_SETTINGS
(unknown)
- CONFIG_ZMS
(unknown)
- CONFIG_NVS
(unknown)
- CONFIG_SAMPLE_BT_CENTRAL_HIDS_CONTINUOUS_REPORT_RX
(bool) Continuous report receiving
Enable the continuous report receiving feature in the central HIDS sample. The sample will automatically enter continuous report receiving mode if it detects a high rate of incoming HID reports.
- CONFIG_SAMPLE_BT_CENTRAL_HIDS_CONTINUOUS_REPORT_RX_STATS_RATE
(int) Continuous RX mode: print statistics every N HID reports
While continuous report receiving is active and the sample is in continuous report receiving mode, the sample prints a short summary every CONFIG_SAMPLE_BT_CENTRAL_HIDS_CONTINUOUS_REPORT_RX_STATS_RATE notifications, instead of logging every payload.
- CONFIG_SAMPLE_BT_CENTRAL_HIDS_PERIPHERAL_COUNT
(int) Maximum simultaneous HID peripheral connections
Number of HID GATT server peripherals this central may connect to at the same time. When set to 2, Bluetooth pairing/connection limits are raised accordingly (see default BT_MAX_CONN and BT_MAX_PAIRED in this file).
- CONFIG_BT_MAX_CONN
(unknown)
- CONFIG_BT_MAX_PAIRED
(unknown)
- CONFIG_SAMPLE_CENTRAL_HIDS_SCI_INTERVAL_MIN_125US
(int) Minimum connection interval (125 microsecond units)
Minimum connection interval in 125 microsecond units (LE connection interval quantum), matching struct bt_conn_le_conn_rate_param.interval_min_125us.
- CONFIG_SAMPLE_CENTRAL_HIDS_SCI_INTERVAL_MAX_125US
(int) Maximum connection interval (125 microsecond units)
Maximum connection interval in 125 microsecond units (LE connection interval quantum), matching struct bt_conn_le_conn_rate_param.interval_max_125us.
- CONFIG_SAMPLE_CENTRAL_HIDS_SCI_SUBRATE_MIN
(int) Subrate factor minimum
Minimum subrate factor, matching struct bt_conn_le_conn_rate_param.subrate_min.
- CONFIG_SAMPLE_CENTRAL_HIDS_SCI_SUBRATE_MAX
(int) Subrate factor maximum
Maximum subrate factor, matching struct bt_conn_le_conn_rate_param.subrate_max.
- CONFIG_SAMPLE_CENTRAL_HIDS_SCI_MAX_LATENCY
(int) Maximum peripheral latency
Maximum peripheral latency, matching struct bt_conn_le_conn_rate_param.max_latency.
- CONFIG_SAMPLE_CENTRAL_HIDS_SCI_CONTINUATION_NUM
(int) Continuation number
Continuation number, matching struct bt_conn_le_conn_rate_param.continuation_number.
- CONFIG_SAMPLE_CENTRAL_HIDS_SCI_SUPERVISION_TIMEOUT_10MS
(int) Supervision timeout (units of 10 ms)
Link supervision timeout, matching struct bt_conn_le_conn_rate_param.supervision_timeout_10ms.
Building and Running
This sample can be found under samples/bluetooth/central_hids in the nRF Connect SDK folder structure.
For more security, it is recommended to use the */ns variant of the board target (see the Requirements section above.)
When built for this variant, the sample is configured to compile and run as a non-secure application using security by separation.
Therefore, it automatically includes Trusted Firmware-M that prepares the required peripherals and secure services to be available for the application.
To build the sample, follow the instructions in Building an application for your preferred building environment. See also Programming an application for programming steps and Testing and optimization for general information about testing and debugging in the nRF Connect SDK.
Note
When building repository applications in the SDK repositories, building with sysbuild is enabled by default.
If you work with out-of-tree freestanding applications, you need to manually pass the --sysbuild parameter to every build command or configure west to always use it.
To build the sample with HID SCI support, use -DFILE_SUFFIX=hid_sci
To build with HID SCI support and two peripherals, use -DFILE_SUFFIX=hid_sci together with -DEXTRA_CONF_FILE=hid-sci-two-periphs.conf.
Testing
After programming the sample to your development kit, you can test it either by connecting to another development kit that is running the Bluetooth: Peripheral HIDS keyboard sample, or by using the Bluetooth Low Energy app that emulates a HIDS server.
Testing with another development kit
Connect to the kit that runs this sample with a terminal emulator (for example, the Serial Terminal app). See Testing and optimization for the required settings and steps.
Reset the kit.
Program the other kit with the Bluetooth: Peripheral HIDS keyboard sample and reset it.
If you see “NFC configuration done” on the peripheral kit, press Button 4 on the peripheral kit to make it start advertising.
When connected, press Button 1 on both devices to confirm the passkey value used for bonding, or press Button 2 to reject it.
Wait until the HIDS keyboard is detected by the central. All detected descriptors are listed. In the terminal window, check for information similar to the following:
HIDS is ready to work
Subscribe to report id: 1
Subscribe to boot keyboard report
Press Button 1 and Button 2 one after another on the kit that runs the keyboard sample and observe the notification values in the terminal window. See Bluetooth: Peripheral HIDS keyboard for the expected values:
Notification, id: 0, size: 8, data: 0x0 0x0 0xb 0x0 0x0 0x0 0x0 0x0
Notification, id: 0, size: 8, data: 0x0 0x0 0x0 0x0 0x0 0x0 0x0 0x0
Press Button 2 on the kit that runs the Central HIDS sample and observe that the protocol mode is updated into boot mode:
Setting protocol mode: BOOT
Press Button 1 and Button 2 one after another on the kit that runs the keyboard sample and observe the notification of the boot report values:
Notification, keyboard boot, size: 8, data: 0x0 0x0 0xf 0x0 0x0 0x0 0x0 0x0
Notification, keyboard boot, size: 8, data: 0x0 0x0 0x0 0x0 0x0 0x0 0x0 0x0
Press Button 1 and Button 3 one after another on the Central HIDS kit and observe that LED 1 on the keyboard kit changes its state. The following information is also displayed in the terminal window.
If Button 1 was pressed:
Caps lock send (val: 0x2)
Caps lock sent
If Button 3 was pressed:
Caps lock send using write with response (val: 0x2)
Capslock write result: 0
Received data (size: 1, data[0]: 0x2)
Connect to the kit that runs this sample with a terminal emulator (for example, the Serial Terminal app). See Testing and optimization for the required settings and steps.
Reset the kit.
Program the other kit with the Bluetooth: Peripheral HIDS keyboard sample and reset it.
If you see “NFC configuration done” on the peripheral kit, press Button 3 on the peripheral kit in order for it to start advertising.
When connected, press Button 0 on both devices to confirm the passkey value used for bonding, or press Button 1 to reject it.
Wait until the HIDS keyboard is detected by the central. All detected descriptors are listed. In the terminal window, check for information similar to the following:
HIDS is ready to work
Subscribe to report id: 1
Subscribe to boot keyboard report
Press Button 0 and Button 1 one after another on the kit that runs the keyboard sample and observe the notification values in the terminal window. See Bluetooth: Peripheral HIDS keyboard for the expected values:
Notification, id: 0, size: 8, data: 0x0 0x0 0xb 0x0 0x0 0x0 0x0 0x0
Notification, id: 0, size: 8, data: 0x0 0x0 0x0 0x0 0x0 0x0 0x0 0x0
Press Button 1 on the kit that runs the Central HIDS sample and observe that the protocol mode is updated into boot mode:
Setting protocol mode: BOOT
Press Button 0 and Button 1 one after another on the kit that runs the keyboard sample and observe the notification of the boot report values:
Notification, keyboard boot, size: 8, data: 0x0 0x0 0xf 0x0 0x0 0x0 0x0 0x0
Notification, keyboard boot, size: 8, data: 0x0 0x0 0x0 0x0 0x0 0x0 0x0 0x0
Press Button 0 and Button 2 one after another on the Central HIDS kit and observe that LED 0 on the keyboard kit changes its state. The following information is also displayed in the terminal window.
If Button 0 was pressed:
Caps lock send (val: 0x2)
Caps lock sent
If Button 2 was pressed:
Caps lock send using write with response (val: 0x2)
Capslock write result: 0
Received data (size: 1, data[0]: 0x2)
Testing with Bluetooth Low Energy app
Connect to the kit that runs this sample with a terminal emulator (for example, the Serial Terminal app). See Testing and optimization for the required settings and steps.
Reset the kit.
Start nRF Connect for Desktop.
Open the Bluetooth Low Energy app and select the connected dongle that is used for communication.
Open the SERVER SETUP tab. Click the dongle configuration and select Load setup. Load the
hids_keyboard.ncsfile that is located undersamples/bluetooth/central_hidsin the nRF Connect SDK folder structure.Click Apply to device.
Open the CONNECTION MAP tab. Click the dongle configuration and select Advertising setup.
The current version of the app cannot store the advertising setup, so it must be configured manually. See the following image for the required target configuration:
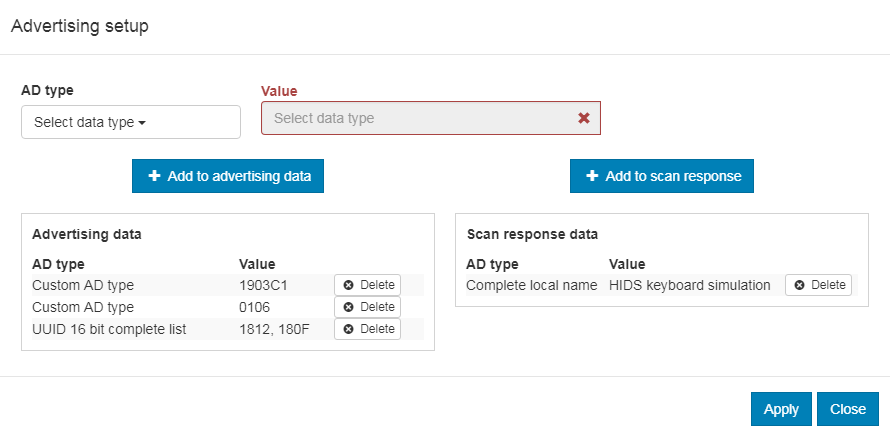
Advertising setup for HIDS keyboard simulator
Complete the following steps to configure the advertising setup:
Delete the default Complete local name from Advertising data.
Add a Custom AD type with AD type value set to
19and Value set to03c1. This is the GAP Appearance advertising data.Add a Custom AD type with AD type value set to
01and Value set to06. This is the AD data with “General Discoverable” and “BR/EDR not supported” flags set.Add a UUID 16 bit complete list with two comma-separated values:
1812and180F. These are the values for HIDS and BAS.Add a Complete local name of your choice to the Scan response data.
Click Apply and Close.
In the Adapter settings, select Start advertising.
Wait until the kit that runs the Central HIDS sample connects. All detected descriptors are listed. Check for information similar to the following:
HIDS is ready to work
Subscribe in report id: 1
Subscribe in boot keyboard report
Explore the first report inside Human Interface Device (the one with eight values). Change any of the values and note that the kit logs the change.
Press Button 2 on the kit and observe that the Protocol Mode value changes from
01to00.Press Button 1 and Button 3 one after another and observe that the Boot Keyboard Output Report value toggles between
00and02.
Connect to the kit that runs this sample with a terminal emulator (for example, the Serial Terminal app). See Testing and optimization for the required settings and steps.
Reset the kit.
Start nRF Connect for Desktop.
Open the Bluetooth Low Energy app and select the connected dongle that is used for communication.
Open the SERVER SETUP tab. Click the dongle configuration and select Load setup. Load the
hids_keyboard.ncsfile that is located undersamples/bluetooth/central_hidsin the nRF Connect SDK folder structure.Click Apply to device.
Open the CONNECTION MAP tab. Click the dongle configuration and select Advertising setup.
The current version of the app cannot store the advertising setup, so it must be configured manually. See the following image for the required target configuration:
Advertising setup for HIDS keyboard simulator
Complete the following steps to configure the advertising setup:
Delete the default Complete local name from Advertising data.
Add a Custom AD type with AD type value set to
19and Value set to03c1. This is the GAP Appearance advertising data.Add a Custom AD type with AD type value set to
01and Value set to06. This is the AD data with “General Discoverable” and “BR/EDR not supported” flags set.Add a UUID 16 bit complete list with two comma-separated values:
1812and180F. These are the values for HIDS and BAS.Add a Complete local name of your choice to the Scan response data.
Click Apply and Close.
In the Adapter settings, select Start advertising.
Wait until the kit that runs the Central HIDS sample connects. All detected descriptors are listed. Check for information similar to the following:
HIDS is ready to work
Subscribe in report id: 1
Subscribe in boot keyboard report
Explore the first report inside Human Interface Device (the one with eight values). Change any of the values and note that the kit logs the change.
Press Button 1 on the kit and observe that the Protocol Mode value changes from
01to00.Press Button 0 and Button 2 one after another and observe that the Boot Keyboard Output Report value toggles between
00and02.
Testing with HID SCI support
To test the sample with HID SCI support, both the central and the peripheral you must build with -DFILE_SUFFIX=hid_sci.
Connect to the kit that runs this sample with a terminal emulator (for example, the Serial Terminal app). See Testing and optimization for the required settings and steps.
Reset the kit.
Program the other kit with the Bluetooth: Peripheral HIDS keyboard sample and reset it.
If you see “NFC configuration done” on the peripheral kit, press Button 4 on the peripheral kit to make it start start advertising.
When connected, press Button 1 on both devices to confirm the passkey value used for bonding, or press Button 2 to reject it.
Wait until the HIDS keyboard is detected by the central. Check for information similar to the following:
HIDS is ready to work
Subscribe in report id: 1
Subscribe in boot keyboard report
Press Button 4 on the central kit to enter the “Alternative button functions” mode.
Press Button 2 on the central kit and wait for the SCI mode to change to DEFAULT.
Cycle through the HID SCI modes by pressing Button 2 on the central kit. The HID SCI mode will change to FAST, LOW POWER, FULL RANGE, and DEFAULT again. You might need to wait a few seconds for the mode to change each time. You will see a message similar to the following:
SCI mode changed notification received, new mode: <mode_name>
Connect to the kit that runs this sample with a terminal emulator (for example, the Serial Terminal app). See Testing and optimization for the required settings and steps.
Reset the kit.
Program the other kit with the Bluetooth: Peripheral HIDS keyboard sample and reset it.
If you see “NFC configuration done” on the peripheral kit, press Button 3 on the peripheral kit to make it start start advertising.
When connected, press Button 0 on both devices to confirm the passkey value used for bonding, or press Button 1 to reject it.
Wait until the HIDS keyboard is detected by the central. Check for information similar to the following:
HIDS is ready to work
Subscribe in report id: 1
Subscribe in boot keyboard report
Press Button 3 on the central kit to enter the “Alternative button functions” mode.
Press Button 1 on the central kit and wait for the SCI mode to change to DEFAULT.
Cycle through the HID SCI modes by pressing Button 1 on the central kit. The HID SCI mode will change to FAST, LOW POWER, FULL RANGE, and DEFAULT again. You might need to wait a few seconds for the mode to change each time. You will see a message similar to the following:
SCI mode changed notification received, new mode: <mode_name>
Dependencies
This sample uses the following nRF Connect SDK libraries:
In addition, it uses the following Zephyr libraries:
include/sys/byteorder.hinclude/zephyr/types.hlib/libc/minimal/include/errno.hinclude/sys/printk.hAPI:
include/bluetooth/bluetooth.hinclude/bluetooth/gatt.hinclude/bluetooth/hci.hinclude/bluetooth/conn.hinclude/bluetooth/uuid.h
The sample also uses the following secure firmware component: