The Bluetooth Mesh subsystem in nRF Connect SDK provides a set of samples that can be used for evaluation of the Bluetooth Mesh DFU specification and subsystem:
To configure and control DFU on the Firmware Distribution Server, use either the Firmware Distribution Client model or the shell commands.
You can use either the nRF Mesh app or the shell commands to configure and control the DFU process.
Note
The Mesh DFU feature in the nRF Mesh app is currently supported only on iOS.
The nRF Mesh app for iOS provides a built-in Firmware Distribution Client model to configure and control the DFU process on the distributor node.
To connect to the distributor node:
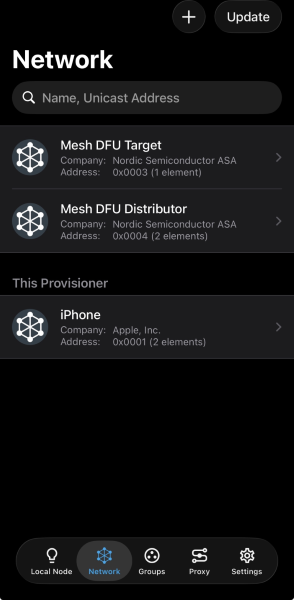
Launch the nRF Mesh app for iOS and navigate to the Proxy screen.
If the Proxy section does not show Mesh DFU Distributor, disable Automatic Connection, tap the Proxy name, and choose the distributor node from the list.
Proxy screen with distributor node connection and proxy filter
The Bluetooth Mesh DFU subsystem in Zephyr provides a set of shell commands that you can use instead of the client.
For a complete list of commands, see the Firmware Distribution Server model section of the Bluetooth Mesh shell documentation.
You can execute the commands in the following two ways:
After the provisioning is completed, a Configuration Client needs to add a common application key to all devices.
The added application key must be bound:
On the Distributor: to the Firmware Distribution Server, Firmware Update Client, BLOB Transfer Server and BLOB Transfer Client models instantiated on the primary element, and to the Firmware Update Server and BLOB Transfer Server models instantiated on the secondary element of the device (see Configuring models on the Distributor node).
On Target nodes: to the Firmware Update Server and BLOB Transfer Server models instantiated on the primary element of the device (see Configuring models on the Target node).
The bound application key will be used in the firmware distribution procedure.
When using the nRF Mesh mobile app for iOS for DFU, bind the application key to the Firmware Distribution Server model on the distributor node.
The app binds the application key to the Firmware Update Server models on the Target nodes automatically.
Navigate to the Network screen and tap the Update button in the top right corner.
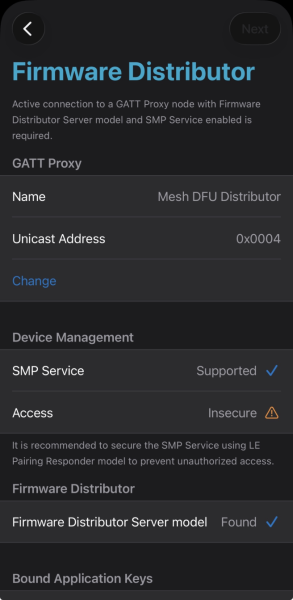
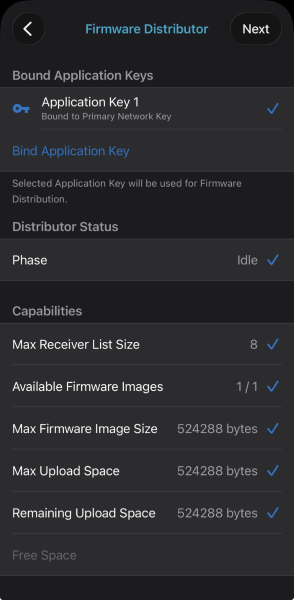
On the Firmware Distribution screen, review the distributor node information, the current state of the Firmware Distribution Server model, and the Capabilities section.
Firmware Distributor screen showing details of the Firmware Distributor Server model
Firmware Distributor with firmware image slot empty and available
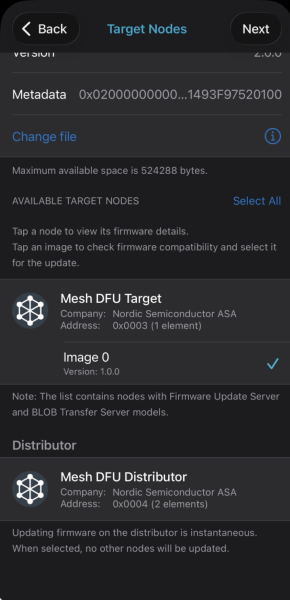
Tap Next in the top right corner of the Firmware Distribution screen to open the Target Nodes screen.
Tap Select File and select the zip archive intended for distribution.
Verify the firmware details shown by the app.
The uploaded image needs to be registered in the Bluetooth Mesh DFU subsystem.
Use the meshmodelsdfuslotadd shell command specifying the size of the image (in bytes) that was uploaded to the Distributor.
Optionally, you can provide the firmware ID, metadata and Unique Resource Identifier (URI) parameters that come with the image.
To add Target nodes to the receivers list:
1. Scroll down to the AVAILABLE TARGET NODES section.
#. Select the nodes to update, or tap Select All to select all nodes.
#. Tap Next in the top right corner of the screen to open the Firmware Distribution screen.
Target Nodes screen with firmware details and available target nodes to select
Add the Target nodes to the DFU transfer using the meshmodelsdfdreceivers-add shell command.
This command specifies the element address of a Target node with the Firmware Update Server instance and the image index on the Target node that needs to be updated.
For example, for two Target nodes with addresses 0x0004 and 0x0005 respectively, and with image index 0, the command looks like this:
meshmodelsdfdreceivers-add0x0004,0;0x0005,0
Note
To remove all receivers from the list, use the meshmodelsdfdreceivers-delete-all command.
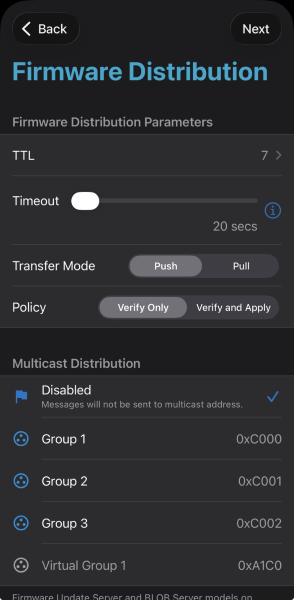
Set the transfer TTL, Timeout, Transfer Mode, and Update Policy (you may leave default values as is).
To transfer the firmware to several Target nodes simultaneously, select the desired group address under the Multicast Distribution section.
Firmware Distribution screen with transfer parameters and multicast options
To start the DFU transfer, use the meshmodelsdfdstart shell command.
This command requires two mandatory arguments, app_idx and slot_idx:
* For app_idx, use the application key index that is bound to the Firmware Distribution Server and other Firmware Update and BLOB Transfer models on the Distributor and Target nodes.
* For slot_idx, use the ID of the slot allocated by the meshmodelsdfuslotadd shell command.
For example, to run the DFU transfer in unicast mode, with AppKey index 0 and slot ID 0, use the following command:
meshmodelsdfdstart00
By default, the Firmware Distribution Server will request the Firmware Update Servers to apply the image immediately after the DFU transfer.
To avoid applying the image immediately and only verify it, set the fourth argument to 0:
meshmodelsdfdstart0000
Note
After a successful firmware distribution, set the Firmware Distribution Server to idle state using the meshmodelsdfdcancel shell command to initiate a new firmware distribution.
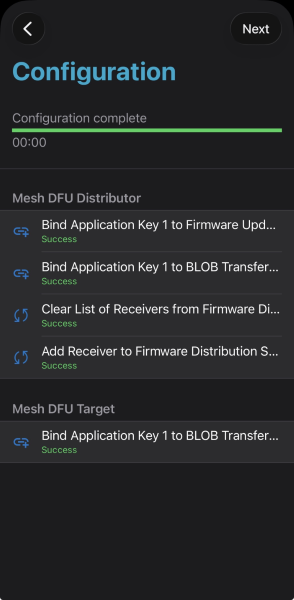
After setting the Firmware Distribution parameters and multicast options, tap Next in the top right corner of the screen.
The app binds the necessary keys and subscribes the target nodes to the group address.
When configuration is complete, tap Next again.
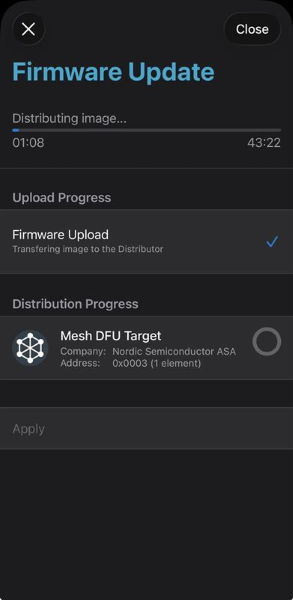
The app uploads the firmware image to the distributor node over SMP (Firmware Upload; typically a couple of minutes), then instructs the distributor to start the Firmware Distribution process.
Firmware Update screen while uploading image to the distributor
Once the distribution process starts, the screen continues to show the distribution progress and remaining time.
Firmware Update screen during distribution to target nodes
To exit the Firmware Update screen without canceling the distribution, tap the Close button in the top right corner of the screen (the distribution process continues in the background).
The mobile device may be disconnected; the distributor node continues the Firmware Distribution process in the background.
To get back to the ongoing distribution process, navigate to the Network screen and tap the Update button in the top right corner.
To cancel the distribution process, tap the X button in the top left corner.
The transfer will take a couple of minutes, depending on the number of Target nodes and the network quality.
To check the transfer progress, use the meshmodelsdfdreceivers-get shell command, for example:
To see the distribution status, phase and parameters of the DFU transfer, use the meshmodelsdfdget command.
When the DFU transfer successfully completes, the phase will be set to BT_MESH_DFD_PHASE_TRANSFER_SUCCESS, for example:
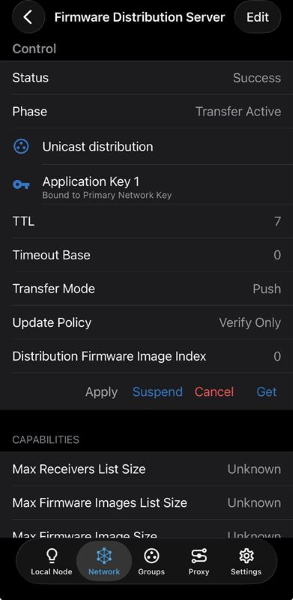
Navigate to the element list and tap Element 1, then Firmware Distribution Server.
On the Firmware Distribution Server screen, scroll to the Control section and tap Get to obtain the current state.
Tap the Suspend button.
Firmware Distribution Server screen with status, phase, and control actions
To suspend the firmware distribution, use the meshmodelsdfdsuspend shell command.
The distribution phase is switched to BT_MESH_DFD_PHASE_TRANSFER_SUSPENDED in this case.
To resume the DFU transfer after suspending, use the meshmodelsdfucliresume shell command.
Depending on the update policy set at the start of the DFU transfer, the Firmware Distribution Server will do the following:
If policy_apply is set to true or omitted when the DFU transfer starts, the Firmware Distribution Server will immediately apply the new firmware on the Target nodes upon the DFU transfer completion.
If policy_apply is set to false, the image needs to be applied manually.
When the update policy was set to Verify Only, the target nodes wait for an apply message after the distribution completes.
To apply the firmware:
Navigate to the Network screen.
Tap the Mesh DFU Distributor node.
Navigate to the element list and tap Element 1, then Firmware Distribution Server.
On the Firmware Distribution Server screen, scroll to the Control section and tap Get to obtain the current state.
Tap the Apply button.
Firmware Distribution Server screen with status, phase, and control actions
If the update policy was set to Verify Only, use the meshmodelsdfdapply command to apply the image manually after the DFU transfer is completed.
When the Firmware Distribution Server starts applying the transferred image, the distribution phase is set to BT_MESH_DFD_PHASE_APPLYING_UPDATE.
After applying the new firmware, the Firmware Distribution Server will immediately request firmware ID of the currently running firmware on the Target nodes to confirm that the new firmware has been applied successfully.
Depending on the bt_mesh_dfu_effect value received from the Target nodes after the DFU transfer is started, the following cases are possible:
If the image effect for a particular Target node is BT_MESH_DFU_EFFECT_UNPROV, the Firmware Distribution Server does not expect any reply from that Target node.
If the Distributor does not receive any reply, it will repeat the request several times.
If the Distributor eventually receives a reply, the DFU for this particular Target node is considered unsuccessful.
Otherwise, the DFU is considered successful.
In all other cases, the Distributor expects a reply from the Target node with the firmware ID equal to the firmware ID of the transferred image.
If the Target node responds with a different firmware ID or does not respond at all after several requests, the DFU for this particular Target node is considered unsuccessful.
Otherwise, the DFU is considered successful.
The DFU ends after the Distributor stops polling the Target nodes.
If the DFU completes successfully for at least one Target node, the firmware distribution is considered as successful.
In this case, the distribution phase is set to BT_MESH_DFD_PHASE_COMPLETED.
If the DFU does not complete successfully, the distribution phase is set to BT_MESH_DFD_PHASE_FAILED.
Navigate to the element list and tap Element 1, then Firmware Distribution Server.
On the Firmware Distribution Server screen, scroll to the Control section and tap Get to obtain the current state.
Tap the Cancel button.
Alternatively, tap the Update button on the Network screen to open the Firmware Distribution flow, then tap the X button in the top left corner of the Firmware Update screen.
To cancel the firmware distribution, use the meshmodelsdfdcancel shell command.
You can cancel the firmware distribution on a specific Target node at any time by sending a Firmware Update Cancel message.
Use the meshmodelsdfuclicancel shell command specifying the unicast address of the Target node.
To recover from a failed distribution, clear the distribution phase and optionally clear the firmware slots so that a new distribution can be started.
To clear the distribution phase and reset the Firmware Distribution Server state, follow the steps in Cancelling the distribution.
To clear the list of firmware slots (for example, to remove slot data from the failed distribution before retrying):
Navigate to the Network screen.
Tap the Mesh DFU Distributor node.
Navigate to the element list, tap Element 1, tap Firmware Distribution Server, and scroll to the Firmware Distribution Slots section.
Tap Get to obtain the current list of firmware slots.
To remove a slot: swipe left on the slot and tap Delete or to remove all slots: tap Delete All.
Then start the distribution process again from the beginning.
If the firmware distribution fails, clear the list of Target nodes and set the distribution phase to BT_MESH_DFD_PHASE_IDLE before making a new attempt.
By enabling the SB_CONFIG_DFU_ZIP_BLUETOOTH_MESH_METADATA option in sysbuild, the metadata will be automatically parsed from the .elf and .config files.
The parsed data is stored in the ble_mesh_metadata.json file.
The file is placed in the dfu_application.zip archive in the build folder of the application.
Additionally, the metadata string and, optionally, the firmware ID required by the meshmodelsdfuslotadd command are printed in the command-line window when the application is built:
If this option is selected, the SB_CONFIG_DFU_ZIP_BLUETOOTH_MESH_METADATA_FWID_CUSTOM_HEX option must be set to a valid Firmware ID.
At minimum, it should include a Company ID in little-endian order.
The rest of the string is vendor-specific version information.
When using the Firmware Distribution Server for distribution, the number of bytes in the Firmware ID of images used during distribution must not exceed the value of the CONFIG_BT_MESH_DFU_FWID_MAXLEN Kconfig option set on the distributor node.
The Firmware ID (FWID) specified in the JSON file must match the fwid used when initializing the Firmware Update Server.
This ensures that after the firmware update is applied, the node will respond with the correct Current Firmware ID in the Firmware Update Information Status message.
Note
It is required that the Composition Data is declared with the const qualifier.
If the application contains more than one Composition Data structure (for example, when the structure to be used is picked at runtime), the script will not print any encoded metadata.
In this case, use the JSON file to find the encoded metadata matching the Composition Data to be used by the device after the update.
Additionally, the script is hardcoded to produce a metadata string where the firmware is targeted for the application core.
A separate west command can be utilized to print the metadata to the console, given that it is already generated by the build system.
This gives the user easy access to this information, without having to enter the .json file in the build folder or to rebuild the application:
westbuild-tble_mesh_dfu_metadata
For this particular example, the following output is generated:
The Bluetooth Mesh DFU subsystem provides a set of shell commands that can be used to compose a firmware metadata.
The format of metadata is defined in the bt_mesh_dfu_metadata structure.
For the complete list of commands, see DFU metadata.
To start composing metadata, use the meshmodelsdfumetadatacomp-add shell command that encodes a Composition Data header.
For example, for a Target node with product ID 0x0059, zero company and version IDs, 10 entries in the replay list, and with Relay, Proxy and Friend features enabled, the command will be the following:
meshmodelsdfumetadatacomp-add0x5900107
Now you need to encode elements that are present on a new image.
For each element to encode, use the meshmodelsdfumetadatacomp-elem-add shell command specifying the location of the element, number of Bluetooth SIG and vendor models and their IDs.
For example, for Bluetooth Mesh: Device Firmware Update (DFU) target sample, which has only one element containing Configuration and Health Server models as well as DFU and BLOB Transfer Server models, the command will be the following:
In case of any mistakes during the encoding of the Composition Data, use the meshmodelsdfumetadatacomp-clear command to clear the cached value, then start composing the metadata from the beginning.
When all elements are added, generate a hash of the Composition Data using the meshmodelsdfumetadatacomp-hash-get shell command.
For example, using the inputs from the commands above, the output of this command should be the following:
The generated hash will then be encoded into the metadata.
Use the meshmodelsdfumetadataencode shell command to encode the metadata.
For example, using the Composition Data hash generated above, the command to encode the metadata for firmware version 2.0.0+0, with a size of 241236 bytes and targeted to application core, will be the following: