RZ/V2N Evaluation Board Kit
Overview
The RZ/V2N is a vision AI microprocessor (MPU) with Renesas proprietary AI accelerator (DRP-AI3) supporting up to 15TOPS AI performance. Its CPUs are quad Arm Cortex-A55 (1.8GHz) and Arm Cortex-M33 (200MHz). The RZ/V2N is equipped with an ISP (Image Signal Processor) and dual-channel MIPI CSI-2 camera interfaces for supporting dual camera signal processing, which is crucial for realizing vision systems. It is also equipped with high-speed interfaces such as PCIe and USB 3.2, allowing for the expansion of external devices. The RZ/V2N is an ideal microprocessor for applications requiring both low power consumption and advanced AI inference, such as DMS (Driver Monitoring System), monitoring cameras, mobile robots, and more.
RZ/V2N Evaluation Board (CPU Board):
CPU: RZ/V2N
PMIC: RAA215300
Clock generator: 5L35023B
Main memory: LPDDR4X 8GB x1
xSPI Flash memory: 64MB
External memory: microSD x1
Board-to-board connector for sub boards
High-speed interface: * Gigabit Ethernet x2 ports * USB 3.2 Gen2 x1ch (Host only) * USB 2.0 x1ch (OTG) * PCIe Gen3 x1ch (2 lanes max) * MIPI CSI-2 x2ch * MIPI DSI x 1ch * GPIO: 86 pins
RZ/V2H-EVK Expansion Board (EXP Board): Shared with RZ/V2H
HDMI Tx x1ch
Audio auxiliary input connector x1ch
Audio microphone input connector x1ch
Audio headphone output connector x1ch
Pmod x4
Hardware
The Renesas RZ/V2N documentation can be found at RZ/V2N Group Website [5]
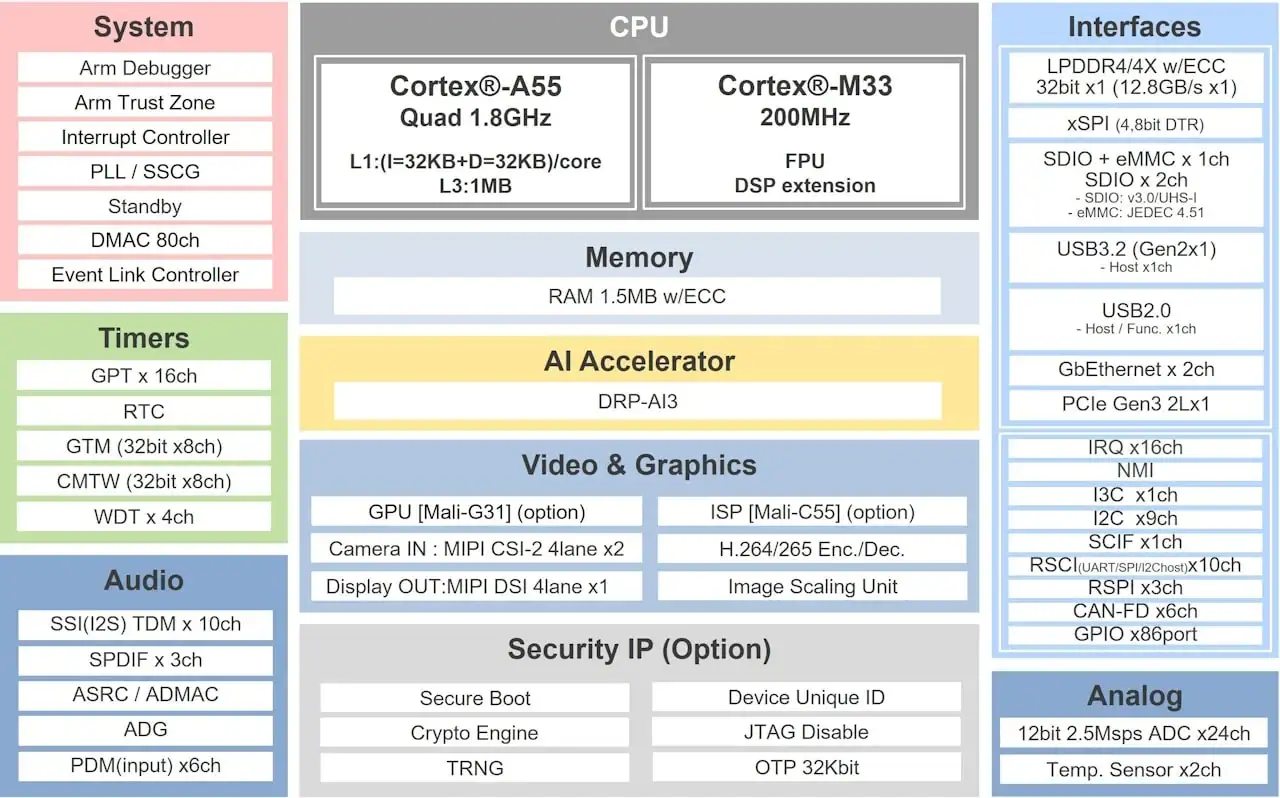
RZ/V2N block diagram (Credit: Renesas Electronics Corporation)
Detailed hardware features for the board can be found at RZV2N-EVK Website [4]
Supported Features
The rzv2n_evk board supports the hardware features listed below.
- on-chip / on-board
- Feature integrated in the SoC / present on the board.
- 2 / 2
-
Number of instances that are enabled / disabled.
Click on the label to see the first instance of this feature in the board/SoC DTS files. -
vnd,foo -
Compatible string for the Devicetree binding matching the feature.
Click on the link to view the binding documentation.
Connections and IOs
By default, the board is configured for use with:
SCI_UART
SCI_UART0:
TX = Pmod 3A pin 2
RX = Pmod 3A pin 3
LED
LED5 (yelow) = P0_0
LED6 (yelow) = P0_1
Programming and Debugging (M33)
The rzv2n_evk board supports the runners and associated west commands listed below.
| flash | debug |
|---|
Applications for the rzv2n_evk board can be built in the usual way as
documented in Building an Application.
Console
The UART port for Cortex-M33 System Core can be accessed by connecting Pmod USBUART
to the upper side of PMOD Type 3A.
Debugging
It is possible to load and execute a Zephyr application binary on
this board on the Cortex-M33 System Core from
the internal SRAM, using JLink debugger (J-Link Debug Host Tools).
Here is an example for building and debugging with the Hello World application.
# From the root of the zephyr repository
west build -b rzv2n_evk/r9a09g056n48gbg/cm33 samples/hello_world
west debug
Flashing
RZ/V2N-EVK is designed to start different systems on different cores. It uses Yocto as the build system to build Linux system and boot loaders to run Zephyr on Cortex-M33 with u-boot. The minimal steps are described below.
Download Multi-OS Package from the RZ/V2N Group Handbook [1]
Unzip Multi-OS Package then open “r01qs0078ej****-rzv2n-multi-os-pkg” PDF file.
Follow “3.2 Integration of OpenAMP related stuff” to build RZ/V2N AI SDK Source Code. Uncomment the following lines in meta-rz-features/meta-rz-multi-os/meta-rzv2n/conf/layer.conf.
#MACHINE_FEATURES_append = " RZV2N_CM33_BOOT"
MACHINE_FEATURES_append = " SRAM_REGION_ACCESS"
#MACHINE_FEATURES_append = " CM33_FIRMWARE_LOAD"
#MACHINE_FEATURES_append = " CA55_CPU_CLOCKUP"
The below necessary artifacts will be located in the build/tmp/deploy/image
Artifacts |
File name |
|---|---|
Boot loader |
bl2_bp_spi-rzv2n-evk.srec fip-rzv2n-evk.srec |
Flash Writer |
Flash_Writer_SCIF_RZV2N_DEV_LPDDR4X.mot |
SD card image |
core-image-weston-rzv2n-evk.wic.bmap core-image-weston-rzv2n-evk.wic.gz |
Carry out 1-9 of Step “1-B Write the Linux files to SD card” at Step 7 Deploy AI Application [2] to prepare SD card.
Run the following commands to write zephyr.bin to SD card.
$ sudo mkdir /mnt/sd -p
$ sudo mount /dev/sdb2 /mnt/sd
$ sudo cp /path/to/zephyr.bin /mnt/sd/boot
$ sync
$ sudo umount /mnt/sd
Warning
Change /dev/sdb to your microSD card device name. Use dh -h to check.
Insert the SD card into SD1 of RZ/V2N EVK, set up board at eSD mode (DSW1[4:5] = ON, OFF).
Turn on the board carefully, see “3.3.2.4 Power Supply” in Getting Started with Flexible Software Package [3] Then, you should see the following message on the console associated with CN12 of RZ/V2N EVK.
U-Boot 2021.10 (Sep 19 2024 - 10:13:55 +0000)
CPU:   Renesas Electronics CPU rev 1.0
Model: Renesas EVK based on r9a09g056
DRAM:  7.9 GiB
MMC:   mmc@15c00000: 0, mmc@15c10000: 1
Loading Environment from SPIFlash...
SF: Detected mt25qu512a with page size 256 Bytes, erase size 64 KiB, total 64 MiB
OK
In:    serial@11c01400
Out:   serial@11c01400
Err:   serial@11c01400
Net:   eth0: ethernet@15c30000
Hit any key to stop autoboot: 3
Hit any key within 3 sec to stop autoboot.
Carry out the following setup of u-boot to kick CM33 Core.
=> setenv cm33start 'dcache off
=> mw.l 0x10420D2C 0x02000000
=> mw.l 0x1043080c 0x08003000
=> mw.l 0x10430810 0x18003000
=> mw.l 0x10420604 0x00040004
=> mw.l 0x10420C1C 0x00003100
=> mw.l 0x10420C0C 0x00000001
=> mw.l 0x10420904 0x00380008
=> mw.l 0x10420904 0x00380038
=> ext4load mmc 0:2 0x08003000 boot/zephyr.bin
=> mw.l 0x10420C0C 0x00000000
=> dcache on'
=> saveenv
=> run cm33start